


Through the symbol style settings area in the marker symbol selector, you can style point symbols, including marker size, color, angle, and other effects.
First, select a point symbol in the symbol list, and the style set in the symbol style settings area will be applied to the selected point symbol.
 |
| Symbol style settings area |
The following details what styles can be set in the symbol style settings area and how to set them.
Point Marker Size
Marker Size and Display Size
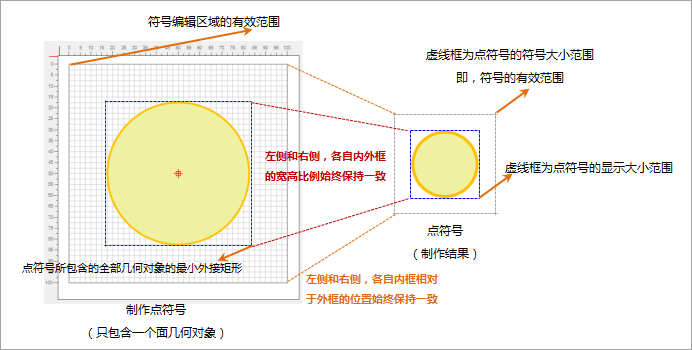
When creating point symbols, the valid range in the symbol editing area corresponds to the valid range of the point symbol after creation, as shown below. In practical applications, the display size of the point symbol on the map is determined by setting the marker size, which includes marker size and display size:
- The display size of the symbol refers to the dimensions of the minimum bounds of all geometries contained within the point symbol.
- The marker size refers to the dimensions of the valid range of the symbol.
- When creating a point symbol in the symbol editing area, the width-to-height ratio of the minimum bounds of all drawn geometries (within the valid range of the symbol editing area) to the valid range of the symbol editing area remains consistent with the ratio after creation. Thus, setting the marker size value allows calculation of the display size value based on the proportion, and vice versa.
- When creating a point symbol in the symbol editing area, the relative position of the minimum bounds of all drawn geometries (within the valid range of the symbol editing area) to the valid range remains consistent after creation. This ensures that regardless of how the point symbol size changes, the position of the symbol content relative to the valid range remains unchanged.
If the minimum bounds of all geometries within the point symbol coincide with the valid range of the point symbol, then the marker size equals the display size. Typically, the creator and user of the symbol are different individuals. Users may not know the width-to-height ratio relationship between the minimum bounds of all geometries and the symbol valid range set during creation. In such cases, setting the display size provides convenience, allowing direct control over the display dimensions of the point symbol content.
 |
| Illustration of marker size and display size |
When performing symbol style settings, if the marker size of the point symbol shown above is set to 50, and the width-to-height ratio of the valid range to the minimum bounds of all geometries in the point symbol is 5:3, the display size can be calculated as 30. If the display size is set to 60, the marker size can be calculated as 100.
 |
- Symbol Size:
The symbol width and symbol height input boxes are used to set the height and width dimensions of the marker size, in units of 0.1 millimeters. You can set values by entering numbers or by clicking the arrow on the right to pop up a slider, adjusting the slider position, or clicking the zoom-in or zoom-out buttons.
When using the marker symbol selector to set the symbology style for point objects on a map layer, if you need to hide the point symbol (i.e., the point objects on the symbolized map layer will have no display style and be invisible), set the marker size or display size value to -1.
- Display Size:
The display width and display height input boxes are used to set the height and width dimensions of the symbol display size, in units of 0.1 millimeters. You can set values by entering numbers or by clicking the arrow on the right to pop up a slider, adjusting the slider position, or clicking the zoom-in or zoom-out buttons.
- Lock Aspect Ratio:
Check the lock aspect ratio checkbox to maintain the symbol's width-to-height ratio. When setting marker size or display size, adjusting the width value automatically adjusts the height value proportionally, and vice versa. If unchecked, you can set height and width values independently without maintaining the aspect ratio.
Point Symbol Rotation
Rotate: Used to set the rotation angle of the symbol, in degrees. You can set values by entering numbers or by clicking the arrow on the right to pop up a slider, adjusting the slider position, or clicking the zoom-in or zoom-out buttons.
Point Symbol Color
Color:Used to set the display color of the symbol. Click the drop-down button on the right to pop up a color palette for selecting or specifying the symbol color. If the selected symbol is a raster symbol, color cannot be set. If the symbol is a vector symbol but some strokes were set as fixed color during creation, setting the point symbol color only affects strokes not fixed; fixed color strokes retain their original color.
Point Symbol Effects
Transparency:Used to set the transparency effect of the symbol. This can only be applied to raster symbols. The transparency value ranges from 0 to 100, where 0 means completely opaque and 100 means completely transparent. You can set values by entering numbers or by clicking the arrow on the right to pop up a slider, adjusting the slider position, or clicking the zoom-in or zoom-out buttons.
Additional Notes
When using embedded image SVG symbols to set layer style, it is recommended to use the original size of the SVG symbol (i.e., uncheck "use original size" and set both point symbol width and height to 0) to prevent display distortion caused by image stretching.