


Instructions for use
Model Clipping implements custom clipping of Model Dataest. You can select, draw, or import faces as clipping areas.
This method is convenient for users to obtain Model Data in a specific range according to their needs.
Operation steps
- Right-click Datasource in Workspace Manager and select Open File Datasource "to open the Datasource containing the Model Dataest.
- Select Model Dataest, right-click the Add to New Spherical Scene ", select the Model Dataset Layer in Layer Manager, and right-click the Jump to Layer".
- Click the Model Edit Drop-down Button in the Model Operation group of the 3D Geographic Design tab and select Model Clipping "from the drop-down menu. The Model Clipping "panel pops up, as shown in the following figure:
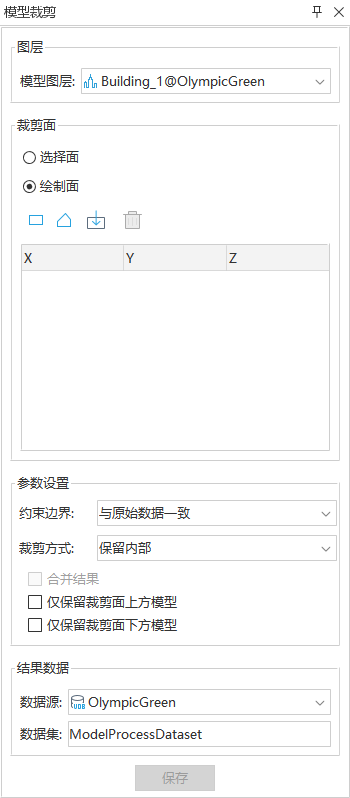
Image: Model Clipping "Panel - Model layer: In the layer group, click the drop-down arrow to the right of Model Layer and select Crop Layer of Object.
- Trim Faces: provides two ways to determine the trim faces: Select Face and Draw Face.
When Select Faces is selected, select the crop face object in the scene.
When Draw Faces is single selected, select the Rectangle, Polygon, or Import tool in the toolbar to draw specific crop faces. For the Rectangle and Polygon tools, the mouse changes to a "+" sign in the scene, click Draw Region, and right-click to end the draw. For the Import tool, the Import dialog box will pop up. Select Region Dataset as the crop region, as shown in the following figure.
- Parameter Settings: Includes Clip Mode and constraint boundaries.
Click the drop-down arrow in the combo box to the right of Constrain Boundaries, and select one of the two constraint methods in the Keep with clip polygon "or Keep with source data". "Keep with clip polygon" indicates that the clipping result boundary elevation value is consistent with the original one and remains unchanged. "Keep with source data" indicates that the clipping result boundary elevation value is consistent with the clipping surface boundary elevation value.
Click the combo box drop-down arrow to the right of the Clip Mode ". Clip Mode filters based on the Constrain Boundaries value.
If the constraint boundary is Keep with clip polygon ", the Clip Mode is either Reserved area" or Outside the reserved area ". Where "Reserved area" Clip Mode is to clip and obtain the Model Dataest inside the enclosed area, "Outside the reserved area" Clip Mode is to clip and obtain the Model Dataest outside the enclosed area.
If the constraint boundary is Keep with source data ", Clip Mode is divided into Keep Inside, Keep Outside, Keep Side, Keep Inside and Outside, Keep Inside and Side, Keep Outside and Side, Select one of the six Clip modes.
When the constraint boundary is "Keep with source data", after selecting Clip Mode, the clipping result can be further processed by checking the corresponding check box of the processing method. Includes "Keep External and Side", "Keep the model above the clip plane only" and "Keep the model below the clip plane only".
- Result: Includes Datasource and Dataset.
Click the drop-down arrow in the combo box to the right of Datasource, and select the Datasource of Crop Result Storage.
Enter the file name of the crop Result Storage in the text box to the right ofthe Dataset. The default is the Model Proces sDataset.

Figure: Import dialog box - Click Save to crop the Result Storage.
 Precautions
- When drawing a crop region, you need to look down on the scene to ensure the accuracy of the points you draw.