


Remove Floats
Usage
The Culling Floating Objects from Oblique Photography Data function removes data that is floating in the air within the oblique photography data. This method allows users to cull oblique photography data within a specific range according to their needs.
Function Entry
- 3D Geographic Design Tab -> Oblique Photography Data Operations -> Culling Floating Objects Button
Operation Steps
- Create a new spherical scene. Right-click "Scene" in the Workspace Manager and select "New Spherical Scene".
- Load a 3D tile layer. Select a normal layer in the Layer Manager, right-click and choose "Add 3D Tile Layer". Alternatively, on the "Scene" tab in the "Data" group, click the "Tile" dropdown button and select "Load Tile..." from the pop-up menu.
- Select the 3D tile layer in the Layer Manager, right-click and choose "Quick Locate to This Layer". In the scene window, hold the mouse wheel to adjust the camera to a perspective suitable for drawing the culling area.
- On the "3D Geographic Design" tab in the "Oblique Photography Operations" group, click the "Culling Floating Objects" button to pop up the "Culling Floating Objects" panel. The parameters are set as follows:
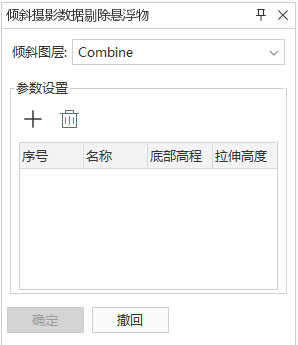
Figure: "Culling Floating Objects" Dialog - Layer: Click the dropdown arrow of the combo box on the right of "Oblique Layer" to select the layer containing the floating objects to be culled.
- Culling Area Definition: Provides a method for drawing the culling area.
- Click the "Add" button. After a red dot appears attached to the mouse cursor, left-click in the scene to start drawing the horizontal range, and right-click to finish drawing the horizontal range. Then move the mouse up to define the height of the drawn area. Right-click again to finish drawing, completing the definition of the floating object culling area.
- Area Parameter Settings:
- In the area object list box, input the "Bottom Elevation" and "Extrusion Height" to customize the height range of the floating object culling area.
- Click "OK" to save the culling of floating objects from the oblique photography data.
 Notes
Notes
- When drawing the floating object culling area, view the scene from a top-down perspective to ensure the accuracy of the drawing points.