When layer editing is not enabled Model Dataset Layer, Model Object editing is supported. Select a Model Object in the scene, right click and select Edit Model "to pop up the Edit Attribute dialog box, and then you can change the geometry and skeleton of the model.
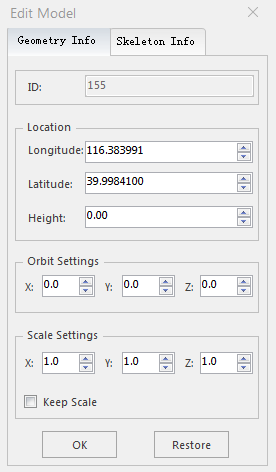
in the Geometry Info "window, as shown in the following figure:
 |
| Figure: Edit Attribute dialog box |
- Position: Enter a new (longitude/latitude/altitude) value to change the spatial position of this object for the purpose of moving the model.
- Orbit Settings: Sets the Rotation angle along the (X/Y/Z) axis respectively.
- Scale Settings: Set the scale of enlargement or reduction along the (X/Y/Z) axis, respectively.
- Keep Scale: is checked by default, which means that when the model is scaled, any one of the X/Y/Z values will be changed, and the other two values will be changed together to ensure that the Scale Factor is consistent.
Model Object, click "OK" to save the current modification and close the "Edit Model" dialog box; click "Reset" to cancel the change operation, restore to the state before editing, and edit the model again.
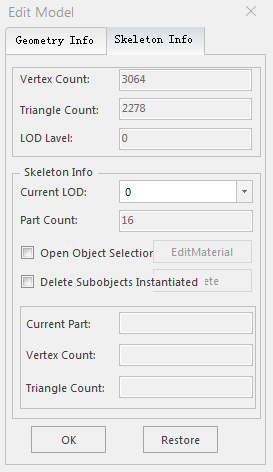
in the Part Info "window, as shown in the following figure:
 |
| Figure: Edit Attribute dialog box |
- Current LOD: Click the drop-down selection box to customize the LOD level of Select Model:.
- Open Sub-Objects Selection: Select this check box to activate the sub-select function, and click the left mouse button in the scene to select a sub-object. The number of the selected sub-objects, the number of vertices, and the Number of triangle planes are displayed.
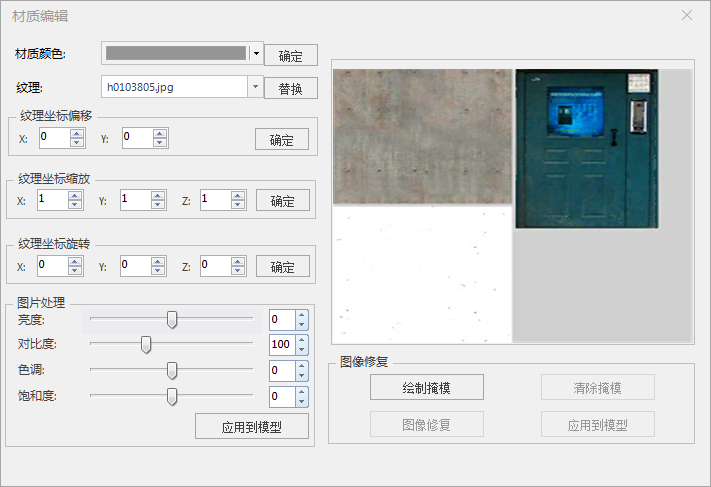
- Edit Material: With a sub-object selected, click this button to bring up the Edit Material "dialog. As shown in the following figure.

Figure: Edit Material Edit dialog box - Material Color: Click the Drop-down Button to Choose the Color value in the Color panel, and then click the OK button to apply it to the sub-objects in real time.
- Texture: Click the Drop-down Button to select a texture in Datasource or click the Replace button to pop up a panel. Select textures with File types of *.png, *.jpg, *.jpeg, *.bmp, *.gif in the dialog box. Click the Open button to complete the Texture Replacement.
- Texture Coordinate Offset: Sets the size of the offset along the (X/Y) axis individually. The default value is 0. The values can be adjusted by clicking the up and down arrows to the right of the X/Y. The up arrow indicates an increasing value and the down arrow indicates a decreasing value. The change value of one click is 0.01. You can also enter the value directly for real-time browsing. You can also select the value box to scroll the mouse wheel by a value of 0.03 per scroll. Click the OK button to apply to child objects in real time.
- Texture Coordinate Scale: Sets the scale of enlargement or reduction along the (X/Y/Z) axis, respectively. The default value is 1. The values can be adjusted by clicking the up and down arrows to the right of X/Y/Z. The up arrow indicates an increasing value and the down arrow indicates a decreasing value. The change value of one click is 0.01. You can also enter the value directly for real-time browsing. You can also select the value box to scroll the mouse wheel by a value of 0.03 per scroll. Click the OK button to apply to child objects in real time.
- Texture Coordinate Rotation: Sets the Rotation angle along the (X/Y/Z) axis, respectively. The default value is 0. The values can be adjusted by clicking the up and down arrows to the right of X/Y/Z. The up arrow indicates an increasing value and the down arrow indicates a decreasing value. The change value of one click is 0.01. You can also enter the value directly for real-time browsing. You can also select the value box to scroll the mouse wheel by a value of 0.03 per scroll. Click the OK button to apply to child objects in real time.
- Picture processing: Adjust the Display Effects of sub-objects by changing the brightness, contrast, hue, and saturation separately. Click the Apply to Model button to apply live to sub-objects and navigate live through Display Effects on the right side of the panel.
- Image inpainting: Realize image inpainting through buttons such as Draw Mask, Clear Mask, Image Inpainting, and Apply to Model.
- Delete Subobjects Instantiated: Check the "Delete Subobjects Instantiated" "check box, and click the" Delete "button to delete the objects with the same skeleton in the currently selected sub-object.
- Delete: Click the "Delete" button to delete the sub-object currently selected.
Model Object, click "OK" to save the current modification and close the "Edit Model" dialog box; click "Reset" to cancel the change operation, restore to the state before editing, and edit the model again.


