3D Buffer Volume
Instructions for use
The 3D Buffer Volume "feature allows you to buffer 3D points, lines, faces, and models into 3D faces or 3D bodies.
Operation steps
- Open the Datasource containing 3D point/line/region/Model Dataest, and add the Dataset that needs 3D Buffer operation to the Spherical Scene.
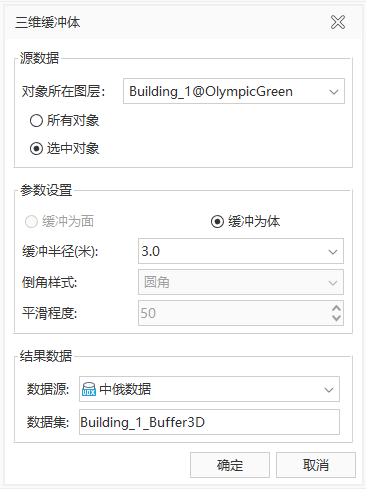
- On the 3D Geographic Design tab, in the 3D Analysis group, click the 3D Buffer Volume button, and the 3D Buffer Volume "dialog box pops up, as shown in the following figure:

Figure: 3D Buffer Volume "dialog box - Source data selection: select the Operation object for 3D Buffer Zone Analysis.
- Confirm Object Layer Click the drop-down arrow on the right side of Object Layer, and select Layer of Object in the pop-up drop-down menu. 3D point layer, 3D line layer, 3D surface layer and model layer are supported.
- Determine object: Select the single All Objects "or Select Objects". When you select the Select Objects ", you need to select the objects on the layer before turning on this feature.
- Parameter Settings: Set the parameters of 3D Buffer operation, including Buffer Type, Extension Radius, Bevel Style, and Smoothness.
- Buffer Type: Single select "Buffer to region" or "Buffer to body". Only Buffer to region "can be selected for Region3D, and only Buffer to body" can be selected for Model Object.
- Buffer Radius: enter directly or select Property Field in the drop-down menu as the Buffer Radius: value in meters. Buffer Radius for model or 3D face data: can be set to a positive or negative value.
- Chamfer Style: Lets you set the chamfer style of the Result Data. For 3D lines Buffer to body, arc and elliptical arc options are available. For 3D face Buffer to region, sharp and rounded corner options are available. This parameter is not available in the remaining cases.
- Smoothness: used to set the smoothness of Result Data. When Buffer Type is selected as Buffer to body, it can be adjusted by directly entering the value or by the up and down arrows on the right. This parameter is not available in the remaining cases.
- Result Data Settings: It includes selecting the Datasource of the Result Data storage and setting the name of the Result Dataset.
- Datasource: Click the drop-down arrow to the right of "Datasource", and Select Datasource in the pop-up drop-down list.
- Dataset: Enter a string as the name of the Dataset.
- After setting the above parameters, click the "OK" button to execute the 3D Buffer operation and generate a Model Dataest named after the specified Dataset Name under the specified Result Datasource.


