


Adding control points is a crucial step in the registration process. Since both the registration layer and reference layer reflect identical or partially overlapping spatial features, it's essential to add control points at characteristic locations on the registration layer while identifying corresponding homologous points at matching feature positions in the reference layer.
This process essentially identifies a series of control points (x,y coordinates) to link spatial positions between the registration dataset and reference data. Control points are precisely identifiable locations present in both the registration dataset and real-world coordinates.
The accuracy, quantity, and spatial distribution of selected control points significantly determine the precision of data registration. Consider the following guidelines when selecting control points:
- Choose distinctive and stable landmark features that are easily identifiable in both registration and reference layers, such as road intersections, main river branches, or field boundaries;
- Ensure uniform distribution of control points across the layer. Concentrated points may improve local accuracy while sparse areas suffer reduced precision. Control points should reflect the overall spatial pattern of the image;
- Select an appropriate number of control points based on practical needs. More points don't necessarily guarantee better results, and minimum quantity requirements of the registration algorithm must be met.
Control points can be added through manual staking or import functions. Detailed explanations follow:
Staking Points
- In the Register tab > Control Point Settings group, click the Staking Points button to activate crosshair cursor mode;
 Tip:
Tip:After completing New Registration, the cursor automatically enters staking mode, allowing direct point placement in the registration window without following the above steps.
- Identify control point positions in the registration layer. Left-click to stake points, marked by blue crosshairs (new points are selected by default). Source coordinates (X,Y) automatically populate in the control point list.
- Locate corresponding positions in the reference layer and left-click to stake homologous points. Reference coordinates (X,Y) will update in the control point list.
 Note:
Note:If reference point coordinates are known, right-click after step 2 and select Input Target Point Coordinates from the context menu for direct entry.
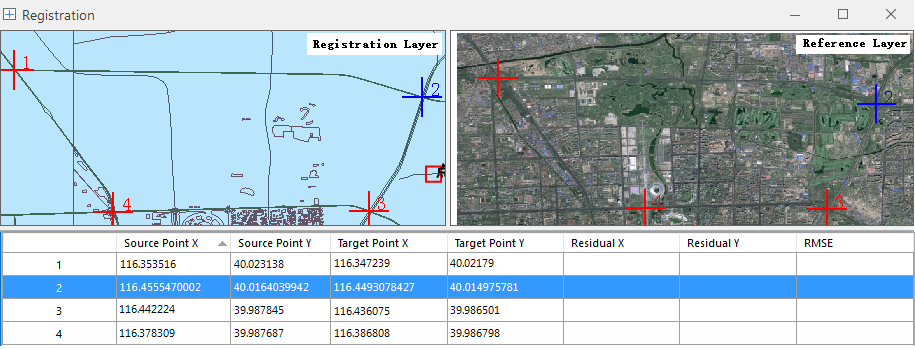
- Repeat steps 2-3 to add multiple control points. This example requires at least 4 control points as shown:
Import Control Points
This function imports existing point datasets from the current workspace as registration and reference points.
Feature Entry
- Register tab > Control Point Settings group > Import button;
- Right-click registration map window > Import Control Points;
- Right-click control point list window > Import Control Points;
Steps
- Click Register tab > Control Point Settings group > Import button. Configure parameters in the dialog:
- Registration Points: Select source point dataset
- Reference Points: Select target point dataset
- Click OK to import specified control points into the current map.
Related Topics
Import/Export Registration Files