


Rotate
Function Description
Rotate selected objects when the layer is editable.
- Rotation Base Point and Center
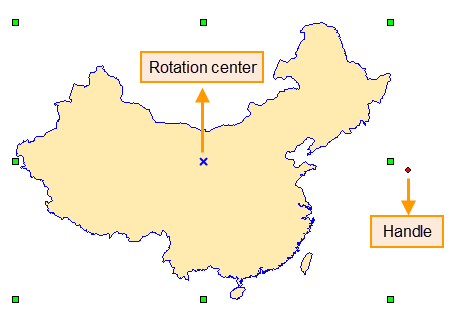
The rotation base point is the upper-left corner of the bounding rectangle of the geometry. The center is inside the geometry (shown as an X shape in the figure below). When rotating the geometry, the base point remains unchanged, and the geometry rotates around the center by the specified angle.
When multiple objects are selected at once, the rotation base point is the upper-left corner of the common bounding rectangle of these objects.
- SuperMap supports rotating objects in point, line, region, text, CAD, and route layers.
- During rotation, you can either drag to rotate the object to the target position, or manually enter a rotation angle to precisely rotate the geometry.
Functional Entry
- Edit Data tab > Object Editing group > General editing > Move and zoom > Rotate
Instructions
Drag to Rotate
- Select one or multiple objects in an editable layer.
- Place the mouse pointer on the rotation handle. When the cursor changes to a rotation state, hold down the left mouse button, drag the object to the desired rotation position, and release the mouse button.
Precise Rotation
- Select one or multiple objects in an editable layer.
- In the Edit Data tab, from the General editing dropdown menu, click the Rotate button in the Move and zoom group. The Rotation Settings dialog box appears.
- The center displays the (X,Y) coordinates of the point. The default center is the center point of the geometry's bounds. Users can set a new rotation base point by modifying the (X,Y) coordinates or by clicking the Coordinate Pickup Rotation center point button.
- Enter a rotation angle in the rotation angle edit box. A positive value rotates the object counterclockwise; a negative value rotates it clockwise. After entering the angle, the map displays a real-time preview of the rotated object (shown with dashed lines).
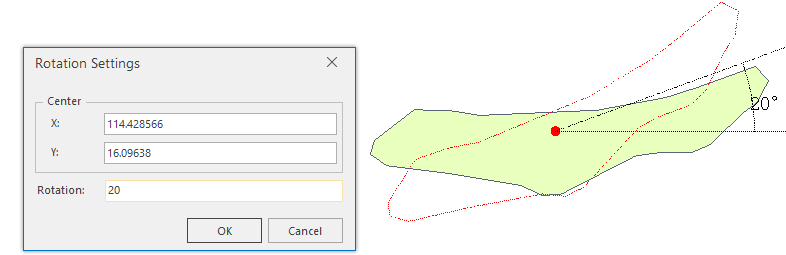
- Click the OK button to rotate the selected geometry.