


↵
Draw Quadrilaterals
Function Description
Rectangles, rounded rectangles, parallelograms, and diamonds are commonly used quadrilaterals. The following describes how to draw these quadrilaterals.
Function Entry
- Edit Data Tab->Object Drawing Group->Polygon Drop-down Selection->Rectangle/Parallelogram.
Operating Instructions
Draw Rectangle
- Draw a right-angle rectangle by entering coordinate values
- In the Edit Data Tab, in the Object Drawing Group, click the Polygon drop-down button, and select Right-angle Rectangle from the drop-down menu. The right-angle rectangle cursor appears.
- Move the mouse to the map. As the mouse moves, the parameter input box behind it displays the coordinate values of the current mouse position in real time. In the parameter input box, enter the coordinate values of a point on the right-angle rectangle (you can switch between the two parameter input boxes by pressing the Tab key), then press Enter to confirm the starting position of the rectangle.
- Move the mouse again and enter the coordinate values of another point on the diagonal direction of the rectangle in the parameter input box, then press Enter to finish drawing.
- Right-click the mouse to cancel the current drawing operation.
- Draw a rectangle by width and height
- In the Edit Data Tab, in the Object Drawing Group, click the Polygon drop-down button, and select Right-angle Rectangle (Width, Height) from the drop-down menu. The rectangle cursor appears.
- Move the mouse to the map. As the mouse moves, the parameter input box behind it displays the coordinate values of the current mouse position in real time. In the parameter input box, enter the coordinate values of a vertex of the rectangle (use the Tab key to switch input focus), then press Enter to confirm the starting position of the rectangle.
- Move the mouse. The map displays the width and height of the rectangle in real time. In the parameter input box, enter the width and height of the rectangle, then press Enter to finish drawing.
- Right-click the mouse to cancel the current drawing operation.
Draw Rounded Rectangle
- In the Edit Data Tab, in the Object Drawing Group, click the Polygon drop-down button, and select Rounded Rectangle from the drop-down menu. The rounded rectangle cursor appears.
- Move the mouse to the map. As the mouse moves, the parameter input box behind it displays the coordinate values of the current mouse position in real time. In the parameter input box, enter the coordinate values of a vertex on the rounded rectangle (you can switch between the two input boxes by pressing the Tab key), then press Enter to confirm the starting position of the rounded rectangle.
- Move the mouse. The map displays the width and height of the rectangle in real time. In the parameter input box, enter the width and height of the rectangle, then press Enter.
- Move the mouse. The arc of the four corners of the rounded rectangle changes accordingly. In the parameter input box, enter the corner radius (length), then press Enter to complete the drawing.
 Notes:
If the entered length is 0 or a negative value, the result is a right-angle rectangle. When the length is greater than half of the shorter side, the corner arc will no longer change.
- Right-click the mouse to cancel the current drawing operation.
The drawing process of a rounded rectangle is shown below:

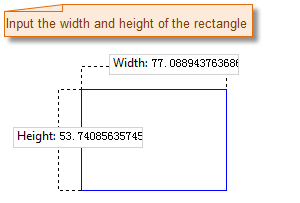
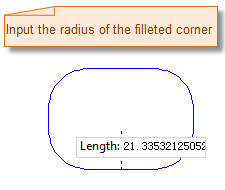
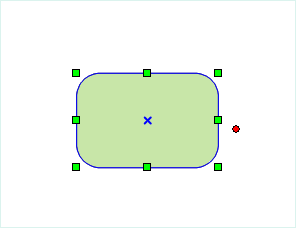
Enter the start point of the rounded rectangle Enter the width and height of the rounded rectangle Enter the corner radius Drawing result
Draw Parallelogram
- Draw a parallelogram by entering coordinate values
- In the Edit Data Tab, in the Object Drawing Group, click the Polygon drop-down button, and select Parallelogram from the drop-down menu. The parallelogram cursor appears.
- Move the mouse to the map. As the mouse moves, the parameter input box behind it displays the coordinate values of the current mouse position in real time. In the parameter input box, enter the coordinate values of a vertex of the parallelogram (you can switch between the two parameter input boxes by pressing the Tab key), then press Enter to confirm the position of the parallelogram.
- Move the mouse and enter the coordinate values of the second control point in the parameter input box (you can switch between the two parameter input boxes by pressing the Tab key), then press Enter to determine the length and direction of one side of the parallelogram.
- Enter the coordinate values of the next control point, press Enter to determine the position of the third control point of the parallelogram. The parallelogram is now drawn.
- Right-click the mouse to cancel the current drawing operation.
- Draw a parallelogram by entering length and angle
- In the Edit Data Tab, in the Object Drawing Group, click the Polygon drop-down button, and select Parallelogram (Length, Angle) from the drop-down menu. The parallelogram cursor appears.
- Move the mouse to the map. As the mouse moves, the parameter input box displays the coordinate values of the current mouse position in real time. In the parameter input box, enter the coordinate values of a vertex of the parallelogram (you can switch between the two parameter input boxes by pressing the Tab key), then press Enter to confirm the starting position of the parallelogram.
- Move the mouse. As the mouse moves, the map displays the length of the line connecting the mouse position to the start point and the angle between it and the positive X-axis in real time. Enter the parameter values in the corresponding text boxes (you can switch between the two parameter input boxes by pressing the Tab key), press Enter to determine the length and angle of one side of the parallelogram.
- Use the same method to enter the length and angle of the other side of the parallelogram, press Enter to complete the drawing of the parallelogram.
- Right-click the mouse to cancel the current drawing operation.
Draw Diamond
- In the Edit Data Tab, in the Object Drawing Group, click the Polygon drop-down button, and select Diamond from the drop-down menu. The diamond cursor appears.
- Move the mouse to the map. As the mouse moves, the parameter input box displays the coordinate values of the current mouse position in real time. In the parameter input box, enter the coordinate values of a vertex of the diamond (you can switch between the two parameter input boxes by pressing the Tab key), then press Enter to confirm the starting position of the diamond.
- Move the mouse. As the mouse moves, the map displays the length of the line connecting the mouse position to the start point and the angle between it and the positive X-axis in real time (you can switch between the two parameter input boxes by pressing the Tab key). Enter the parameter values in the corresponding text boxes, press Enter to determine the angle of the other side of the diamond, then press Enter to complete the drawing of the diamond.
- Right-click the mouse to cancel the current drawing operation.