


Draw Circle
Function Description
A circle can be created using various methods. It can be achieved by specifying the center and radius, diameter, or points on the circumference. The application provides five ways to draw a circle. The default drawing method is to specify the center and radius.
Function Entry
- Edit Data tab -> Object Drawing group -> Polygon drop-down list -> Circle.
Operation Instructions
Draw a Circle by Center and Radius
 |
 |
 |
- In the Edit Data tab, in the Object Drawing group, click the Polygon drop-down button and select Center, Radius from the drop-down menu. The center point cursor appears.
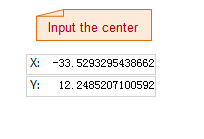
- Move the mouse into the map. As the mouse moves, the coordinate value of the current mouse position will be displayed in real time in the subsequent parameter input boxes. Enter the coordinate value of the center point in the parameter input box (you can switch between the two parameter input boxes by pressing the Tab key), then press the Enter key to confirm the center point.
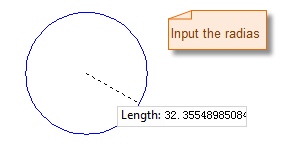
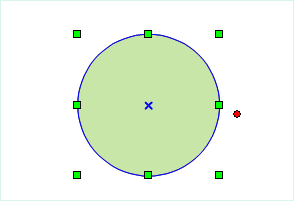
- Move the mouse again and enter the radius (length) in the subsequent parameter input box. Press the Enter key to complete the drawing.
Draw a Circle by Diameter
- In the Edit Data tab, in the Object Drawing group, click the Polygon drop-down button and select Starting Point, Diameter. The circle cursor appears.
- Move the mouse into the map. As the mouse moves, the coordinate value of the point will be displayed in real time in the subsequent parameter input box. Enter the coordinate value of the diameter starting point in the parameter input box (you can switch between the two parameter input boxes by pressing the Tab key), then press the Enter key to confirm the diameter starting point.
- Move the mouse. As the mouse moves, the length of the line connecting the mouse position and the diameter starting point, and the angle between this line and the positive X-axis, will be marked in real time in the map. You can press the Tab key to switch between the two input boxes. Enter the length and angle values in the parameter input boxes.
- After the diameter is determined, press the Enter key to complete the circle drawing.
Draw a Circle by Two Points on the Circumference
- In the Edit Data tab, in the Object Drawing group, click the Polygon drop-down button and select 2 Points. The circle cursor appears.
- Move the mouse into the map. As the mouse moves, the coordinate value of the current mouse position will be displayed in real time in the subsequent parameter input box. Enter the coordinate value of a point on the circumference in the parameter input box (you can switch between the two parameter input boxes by pressing the Tab key), then press the Enter key to confirm the first point on the circle.
- Move the mouse. As the mouse moves, enter the coordinate value of another point on the circumference in the subsequent parameter input box (you can switch between the two parameter input boxes by pressing the Tab key).
- After pressing the Enter key, a circle object will be drawn with the distance between these two points as the diameter.
Draw a Circle by Three Points on the Circumference
- In the Edit Data tab, in the Object Drawing group, click the Polygon drop-down button and select 3 Points. The three-point circle cursor appears.
- Move the mouse into the map. As the mouse moves, the coordinate value of the point will be displayed in real time in the subsequent parameter input box. Enter the coordinate value of the first point on the circumference in the parameter input box (you can switch between the two parameter input boxes by pressing the Tab key), then press the Enter key to confirm the coordinate of the first point on the circle.
- Move the mouse. Enter the coordinate value of the second point on the circumference in the parameter input box (you can switch between the two parameter input boxes by pressing the Tab key), then press the Enter key to confirm the coordinate of the second point on the circle.
- Move the mouse. Enter the coordinate value of the third point on the circumference in the parameter input box (you can switch between the two parameter input boxes by pressing the Tab key), then press the Enter key to draw a circle passing through these three points.
Circumcircle of a Rectangle
- In the Edit Data tab, in the Object Drawing group, click the Polygon drop-down button and select Circumcircle of Rectangle. The circumcircle of rectangle cursor appears.
- Move the mouse into the map. As the mouse moves, the coordinate value of the point will be displayed in real time in the subsequent parameter input box. Enter the coordinate value of the starting point of the rectangle in the parameter input box (you can switch between the two parameter input boxes by pressing the Tab key), then press the Enter key to confirm the starting point position of the rectangle.
- Move the mouse. As the mouse moves, the parameter input boxes will display the height and width of the rectangle in real time (you can switch between the two parameter input boxes by pressing the Tab key). Enter the width and height of the rectangle in the parameter input boxes.
- After pressing the Enter key, a circumcircle of the rectangle determined in the previous step will be created.
 Notes:
Circles drawn in a line dataset are ordinary line objects, which only record the coordinates of each node on the line. However, circles drawn in a CAD dataset are parametric objects, which record corresponding parameters such as radius and center.