


Feature Description
Managing imagery through a mosaic dataset can be considered an imagery ingestion process. Ingestion involves adding imagery to the mosaic dataset, allowing multiple images in different formats (.tif, .tiff, .img) to be added to the same mosaic dataset, even supporting bulk additions in a single operation.
The efficiency of ingestion comes from the fact that the mosaic dataset does not copy the original image files but instead records metadata such as the image path, footprint, and resolution.
Feature Entry
- Start tab -> Create Dataset group drop-down -> Raster/Image/Video -> Mosaic
- Workspace Manager -> Datasource context menu -> Create Dataset -> Mosaic
- Toolbox -> Image Management -> Build Mosaic Dataset -> Build Mosaic Dataset
Steps
Each image's clipping shape is stored as a polygon object in a separate shapefile, with the file name matching the image file name. This *.shp file must be stored in the same directory as the corresponding image file. For more details on the clipping file, see Clipping Display Methods.
- Right-click on the datasource, select New Dataset from the context menu, and choose Mosaic, which will open the Add Mosaic Dataset dialog box.
- Use the toolbar tools to add and remove image files. The mosaic dataset records the absolute path of the added image files.
- Add: Add Drop-down Button contains the following addition options:
- Add File: Add specific image files (
*.img,*.tif,*.tiff, etc.) to the current list. Supports adding images from cloud storage services. - Add Folder: Add all image files from a specified folder. When adding via a folder, users can specify image file types and whether to search subfolders. Supported image formats: IMG, TIFF, ECW, and SID. Also supports adding folders from cloud storage services.
- Add List: Add a specified list file (
*.txt,*.tif,*.tiff, etc.). The program reads the list and adds all referenced images to the current list. The list file (*.txt) supports cloud storage service paths, such as//minio@image/ChinaPart1/H47C001004.tif. For details, refer to Cloud Storage. - Add Mosaic Data: Import an existing mosaic dataset and retrieve its imagery information.
- Add FTP Address: Add an FTP server path and retrieve image files from the FTP server.
- Add File: Add specific image files (
- Delete: Remove unwanted images from the mosaic dataset.
- The sub-dataset list displays basic information about added sub-datasets, including:
- Alias: The name displayed in the imagery dataset collection after the sub-dataset is added.
- Path: The disk path where the image file is stored.
- Add: Add Drop-down Button contains the following addition options:
- Set the Datasource and Dataset Name where the Mosaic Dataset is stored.
- Configure the clipping file, which is commonly used to handle distortions caused by projection transformations. The clipping file defines no-data areas based on reference datasets.
- The clipping file is a vector file storing the image clipping area. The most common format is a shapefile (
*.shp). - Each image has a one-to-one relationship with its clipping file, meaning each image's clipping area is stored in an individual
.shpfile, which must have the same name as the corresponding image file (e.g.,image.tif→image.shp). - Uncheck the Add Clip File: The mosaic dataset will use its clipping function to crop sub-datasets, displaying only valid areas of the imagery. The reference file format is
*.shp. If a corresponding*.shpfile exists in the image folder, selecting this checkbox enables its use; otherwise, the program defaults to using the image's footprint as the clipping boundary.
- The clipping file is a vector file storing the image clipping area. The most common format is a shapefile (
- Set the target coordinate system. When adding image files, the application will set the coordinate system of the first file with a coordinate system as the coordinate system of the current mosaic dataset. It also supports setting the coordinate system in three ways: resetting the coordinate system, copying the coordinate system, and importing the coordinate system in the coordinate system setting toolbar. For more information about mosaic dataset coordinate system settings, please refer to View Image Projection.
- Click OK to complete the build process. The newly created mosaic dataset appears under the datasource node in Workspace Manager, consisting of three elements: Outline, Boundary, and Clip.
- The outline forms the basis for storing and organizing image files in the mosaic dataset. It is a polygon dataset, where each polygon represents the geographic extent of an individual image.

Figure: 30-meter resolution global DEM data (mosaic dataset outline) In addition to geographic extent, the outline manages image file locations, pyramid min/max resolutions, and other metadata. In practical applications, the outline may store additional information such as acquisition date and sensor vendor, which can be achieved through custom fields and field updates.

Figure: Outline dataset attribute table - The boundary is a polygon dataset defining the visible extent of the mosaic dataset. By default, the boundary is generated based on the footprint but can be modified using custom ranges or specified geometries. Adjusting the boundary allows the mosaic dataset to display only the imagery within the new boundary.
- The clip is a polygon dataset controlling the display area of each image. It is generated based on the clipping file selected when creating the mosaic dataset. If no separate clipping file is provided, the image outline is used by default.
- The outline forms the basis for storing and organizing image files in the mosaic dataset. It is a polygon dataset, where each polygon represents the geographic extent of an individual image.
- In the layer manager, a mosaic dataset consists of four parts: boundary lines, labels, outlines, and images. As shown in the figure below, the mosaic dataset contains 6 image datasets, which are displayed in the map window. The pink line frame is the boundary line, the green line is the contour line, and the bottom is the mosaicked image dataset.
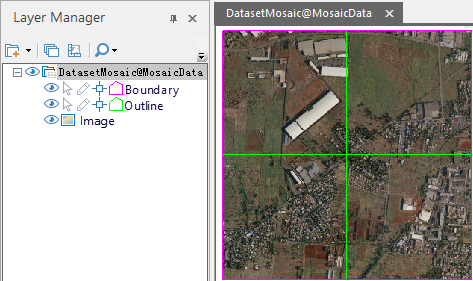
Figure: Mosaic Dataset Structure -
Outline: Represents image footprints based on the spatial reference of the mosaic dataset. Reflects the true extent of images in the mosaic dataset.
-
Boundary: Constructed based on image footprints. The boundary can be dynamically modified to adjust the overall display of the mosaic dataset. In specific use cases, existing vector boundaries or administrative divisions can replace the original mosaic dataset boundary, altering data display.
-
Image: Includes all images managed within the mosaic dataset. Dynamically mosaicked together for visualization.
-
Labels: Displays the file names of the original images added to the mosaic dataset.
-
Related Topics