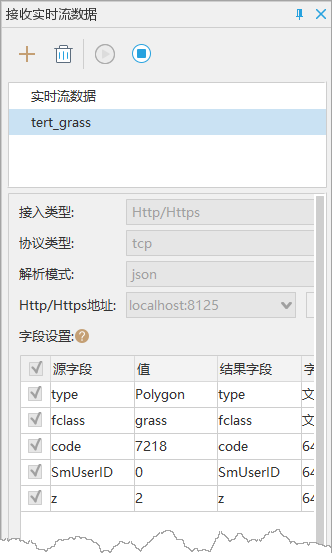
Receive Real-time Stream Data
Feature Description
Real-time streaming data can be received via iServer or Http/Https services, allowing for real-time data transmission between servers and clients, or between clients.
Note:
- When receiving streaming data, ensure that the stream data is in the sending state.
- If multiple broadcasts are sending data to a server simultaneously, the desktop can receive data from multiple broadcast sources at once.
- The desktop can also receive stream data forwarded by multiple servers simultaneously.
Feature Entry
- Online Tab- Real-time Stream Data -> Receive Real-time Stream Data
Parameter Description
- Name: The name of the currently received stream data.
- Access Type: Provides iServer and Http/Https service options.
- WebSocket Address: The request address on the iServer's Subscribe page. After entering the address, click the "Connection Test..." button on the right, and a prompt “Service connection successful, waiting for data access!” will appear.
- Protocol Type: Provides TCP and UDP types.
- Parsing Mode: Provides json and byte stream decoding modes. Currently, only the TCP protocol supports using the json parsing mode.
- Http/Https Address: The address for sending stream data. After entering the address, click the "Connection Test..." button on the right, and a prompt “Service connection successful, waiting for data access!” will appear.
- Field Settings: Specify which stream data fields to save.
- Add to Map: Check this option to automatically display the received data in the map window.
- Refresh Frequency: The time interval for receiving streaming data, defaulting to 1000 milliseconds.
- Save Data: Allows saving the received data locally.
- Storage Mode: Provides two options: New and Append.
- Datasource and Dataset: Choose the dataset and the corresponding datasource where the data will be saved or appended.
- Dataset Type: Choose the type of data to be saved.
- Coordinate System: Select the coordinate system for the data.
- Date Field: For append mode, specify the date field for the data. If the set field name does not exist, a new field will be created and values will be appended to it.
Once the parameters are set, you can start receiving real-time streaming data. The reception status will be displayed in the floating window on the right side of the interface. Buttons on the toolbar allow you to add, delete, start, and stop the reception. Similar icons in the datasource indicate that real-time streaming data is being received.


