


The 3D water surface effect is one of the more gorgeous special effects in the 3D Scene simulation effect. By setting the water surface effect, the water body in the scene can show the effect of reflection and fluctuation, and can simulate the real effect of the water surface in the real world. This kind of water surface effect has a wide application prospect in the landscape display of digital city and other industries.
The water surface effect in the SuperMap scene refers to the water surface effect by selecting the Fill symbol type for the vector surface Dataset settings style in the scene. At the same time, provides 3D Filling Symbol editing function. Users can realize parametric editing of water surface effect in the editor, and set the size, frequency and direction of water waves and water surface reflectivity.
To set the water surface effect
- Import or create a new water surface fill effect in the Face Fill Symbol Library;
- The vector Region Dataset or CAD CADAdd to Scene in which the water surface effect will have to be set;
- Set the Layer Settings as editable, and select a surface layer in Layer Manager. If it is a CAD layer, select a surface object in the scene, and then Object fillStyle Settings the surface as a water surface effect symbol through Style Settings.
Edit the water surface effect
- In the Workspace Manager ", double-click Fill symbol" in the Assets node to open the Fill Symbol Library "dialog box. Click the File Drop-down Button in the dialog box, and select the Import Fill Symbol Library "option in Import. Import the "FillLibrary3D.bru" 3D Symbol library from the "Installation Directory \ Templates \ SymbolLibrary \" folder into the system Fill Symbol Library.
- View the water surface symbols in the Fill Library3D library, select a symbol and click the Edit button to adjust it, or click the New Drop-down Button to select New 3D Filling … Create a new 3D Filling Symbol.
- In the 3D Filling Symbol Editor, the style of the water surface can be set and adjusted, mainly including the information of the 3D Filling Symbol, the snapshot of the symbol, the parameters of the water surface, the setting of the water wave state, etc. In addition,
- In the 3D Filling Symbol Editor, you can preview symbols from multiple angles. The preview area has three coordinate axes in space. The red axis is the X direction, the green axis is the Y direction, and the blue axis is the Z direction. There are plenty of mouse and keyboard operations to preview the 3D Filling Symbol from different angles and orientations. In addition, the user can restore the default perspective state of the system through the "Restore to Default View Point" button at the top of the preview area. In order to facilitate the preview of the effect of the water Fill Style applied to the scene, the scene in the preview area also provides a reference object, which can assist the user to judge whether the set parameters meet the actual application requirements. With the Hide Land scape Model "/Display Land scape Model" button at the top of the preview area, you can control whether or not the landscape of the references in the scene is displayed.
- In the "Symbol Information" area, you can modify the symbol number and Symbol Name, where the symbol number is the Unique Identification of the symbol in the current symbol library.
- After adjusting the effect of the 3D Filling Symbol in the preview area, you can click the "Set Snapshot" button to save it as a snapshot, so that the 3D Filling Symbol will be displayed as the saved snapshot in the Fill Symbol Library management. If you are not satisfied with the currently set snapshot, you can click the Clear Snapshot "button to set Snapshot again.
- Water surface Parameter Settings includes Basic Parameters and advanced parameters, wherein Basic Settings includes water surface brightness, water wave frequency, water wave size and water wave speed; Advance Settings include: water color, reflectance lower limit, reflectance upper limit, reflectance index.
Basic Settings
- Brightness of
- water surface: You can directly input the value or click the button on the right to adjust the brightness of the water body by moving the slider. The brightness value range is between 0 and 1, and the Numerical Precision is 0.01.
- Water wave frequency: input value range: 0.2 to 100, Numerical Precision: 0.01
- Wave size: input value range: 0 to 1, Numerical Precision: 0.01
- Water wave speed: It is used to set the direction and speed of water flow. First, click the mouse in the white area under the water wave speed to determine the direction of the water wave, and then set the speed on the X axis and Y axis in this direction. The range of the speed on the X axis and Y axis is between -100 and 100. When setting the speed of the water wave, the processor can enter a value and adjust the direction using the panel on the left side of the value box.
Advance Settings
- Water surface color: Click the color button on the right to set the water surface color in the color palette.
- Reflectance Ratio Low: Indicates the minimum value for the proportion of the reflected and refracted components in the final water color. Values can range from -0.5 to 0.5.
- Reflectance Ratio Upper Limit: Indicates the maximum value of the proportion of the reflection and refraction components in the final water color. The input value range is: 0.5 to 1.5.
- Reflectance ratio index: It is used to express the sensitivity of the ratio of reflection color to refraction color in water surface color with the change of viewing angle. The value can range from 0 to 10. Numerical Precision is 0.1. When the coefficient is 0, the color of water surface does not change with the change of viewing angle; the larger the coefficient is, the more obvious the color change of water surface caused by the change of viewing angle is.
- After completing the above settings, click the "OK" button in the dialog box to complete the creation of the symbol. At this time, the newly created 3D Filling Symbol can be seen in the Fill Symbol Library.
- After Add to Scene, you can see the Display Effects of the water surface.
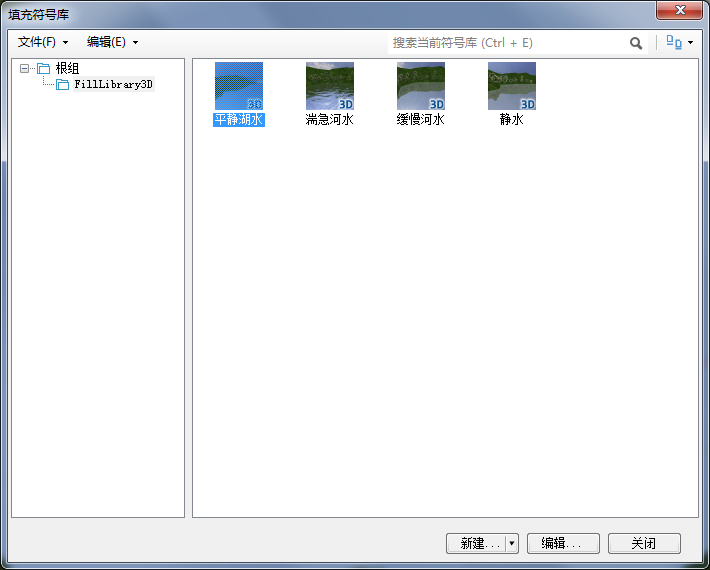 |
| Figure: Water surface Fill symbol |
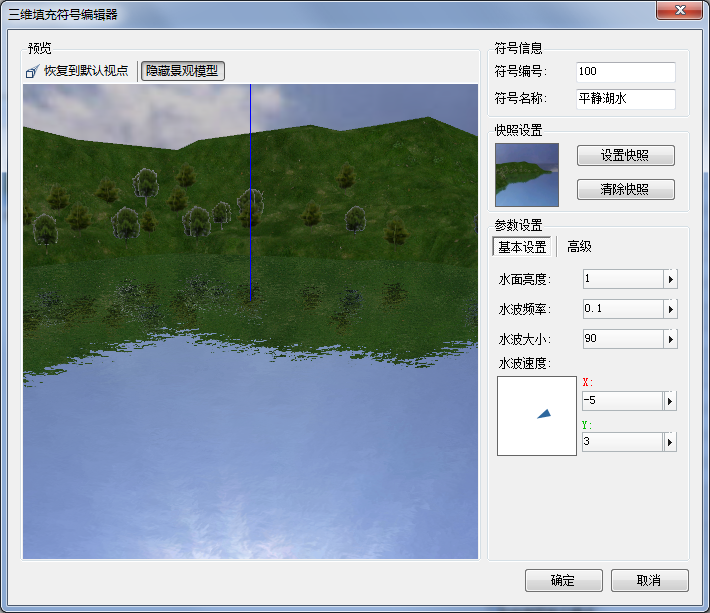 |
| Figure: Water surface Fill symbol editing interface |