


In the Marker Symbol Editor, when making a symbol, each Geometry drawn in the symbol editing area is called a stroke, that is, each Geometry constituting a point symbol is called a stroke. When making a point symbol, you can draw a point object, a line object, a face object, and a Text in the symbol editing area. The content drawn in the Valid Range of the symbol editing area is the graphic content that finally constitutes the point symbol. The objects that make up a point symbol can be a point, a line, a surface, and a Text. Accordingly, the strokes of a point symbol are divided into four types: point, line, surface, and text.
The area in the lower left corner of the Marker Symbol Editor, the Stroke Manager area, is used to organize and manage each stroke in the point symbol drawn in the symbol editing area. The Stroke Manager area consists of a toolbar and a stroke list. The toolbar organizes the Function Buttons that manage strokes. The stroke list displays all the strokes that make up the point symbol (that is, the point symbol drawn in the symbol editing area). Each item in the list corresponds to a stroke of the point symbol.
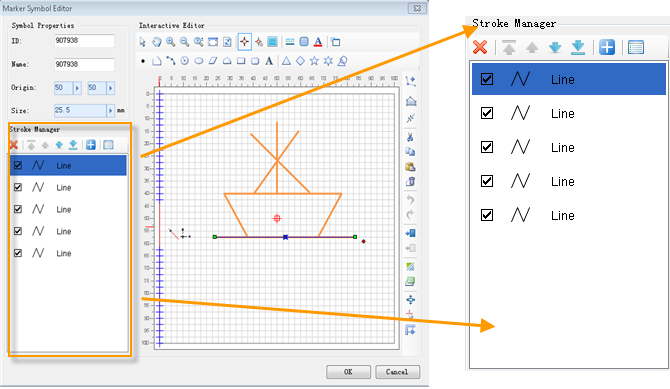
A list of strokes
- Each item in the stroke list corresponds to a stroke of the point symbol, that is, a Geometry drawn in the symbol edit area.
- The Show Name and display graphic for each stroke item indicate the type of Geometry to which the stroke corresponds.
- The check box at the front of each stroke item is used to control whether the stroke is displayed in the symbol editing area. If it is checked, it means it is displayed; if it is not checked, it means it is not displayed.
- The order of each item in the stroke list represents the order in which the corresponding strokes are stacked in the symbol editing area, i.e., the preceding stroke in the stroke list is superimposed on the following stroke in the list.
- When the stroke item is selected in the stroke list, the corresponding stroke in the symbol editing area will also be selected, and vice versa.
Stroke Manager Toolbar
The functions and usage of the buttons on the Stroke Manager toolbar are as follows:
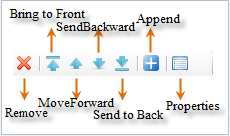
- Remove: Used to delete the selected stroke from the stroke list. Select the stroke to be deleted in the stroke list. You can select multiple strokes by using the Shift key or the Ctrl key. Then, click the Remove button to delete the selected strokes.
- Top: It is used to move a selected stroke in the stroke list to the first position in the list, that is, to move the corresponding stroke in the symbol editing area to the top position, that is, above all other strokes.
- Move Up: is used to move a selected stroke in the stroke list forward by one position, that is, move to the front of the previous stroke.
- Move Down: It is used to move a selected stroke in the stroke list backward by one place, that is, move to the back of the next stroke.
- Bottom: It is used to move a selected stroke in the stroke list to the last position in the list, that is, to move the corresponding stroke in the symbol editing area to the bottom, that is, below all other strokes.
- Append Symbol: Add a point Vector Symbol in other symbol libraries to the current point symbol as a Composite Stroke. The specific operation is as follows:
- Click the Append Symbol button to open the Select Symbol window, which has a structure similar to a Marker Symbol Selector and displays the dot symbols in the current symbol library. Select the point symbol you want to add and click the OK button to add it;
- You can use the Add Symbol Library item under the Symbol Library Management window displayed by pressing the Symbol Library Management button in the Select Symbol window. Adding another Marker Symbol Library file to select a vector point symbol in another Marker Symbol Library as the append target;
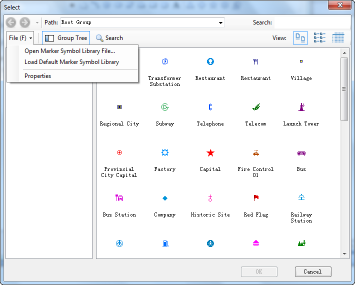 Select a symbol to be added to the currently edited symbol as a Composite Stroke in the
 - Select Symbol window. It must be a vector point symbol;
Here, you can select more than one point symbol as the append target, and each point symbol corresponds to a Composite Stroke.
After - selecting the symbol to be added, click the OK button to complete the addition of the stroke. The Composite Stroke added to the currently edited point symbol is added to the front of the stroke list by default.
- Attribute: Used to set the style of the selected stroke in the stroke list. Select one or more strokes, and then click the Properties button to pop up the Properties dialog box, where you can set the stroke style. The Properties dialog box differs depending on the type of stroke selected. For the operation of setting the stroke style, see: Set the stroke style of the dot symbol .
 Caution:
 - If multiple strokes of different types are selected, the content in the attribute dialog box is the attribute of the top stroke type of the selected strokes.