Oblique photogrammetric data texture replacement
Instructions for use
The Texture Replacement "function replaces the texture of the specified object in OSGB Data, and provides two methods: direct color modification and color mosaic. This method can be used to remove redundant objects or to cull objects that are not clear.
Operation steps
- Create a new Spherical Scene. Right-click the Scene in Workspace Manager and select Create Spherical Scene ".
- Add OSGB/OSGB Cache data. Right-click the Normal Layer "in Layer Manager and select Add 3D Cache Layer.. … Specify the OSGBData Save path to load OSGB data.
- On the 3D Geographic Design tab, in the Oblique Photography Action group, click the Texture Replacement "button and the Oblique Texture Replacement" dialog box appears, as shown in the following image:
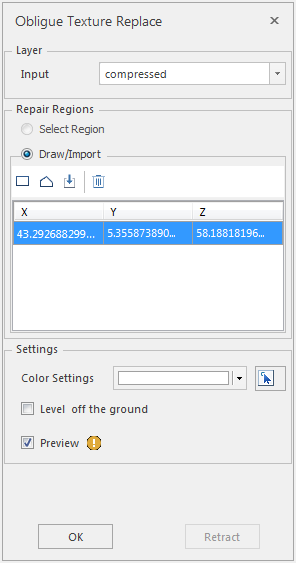
Figure: Bevel Texture Replacement "dialog box - Layer selection
- When the Oblique Texture Replacement feature is
- turned on, if there are multiple Oblique layers in the currently open scene, The Layer of Object to be Texture Replacement needs to be selected from the drop-down list corresponding to the Object layer "under" Oblique Layer "; If only the Dataset layer of the object for which Texture Replacement is required is loaded in the current scene, the text box automatically acquires that layer.
- Repair surface settings
- By default, Paint Face is selected to patch the face. Sketch Patch Faces provides Rectangle, Polygon, Import, and Remove tools.
- Parameter Settings
- Color Settings: Click the drop-down arrow to bring up the Color Selection Panel, where you can click a single color or use the pick tool (Eyedropper tool on the Color Panel or the arrow tool at the far right of Color Settings) to determine the color. The Color Selection Panel is shown in the following figure:
- Flat road plane: Not checked by default. When Choose Color, only the texture color is modified. Select "Flat road plane" to flatten the Selected Region.
- Preview setting: if preview is checked by default, the Texture Replacement effect will be displayed in real time when the color is modified.
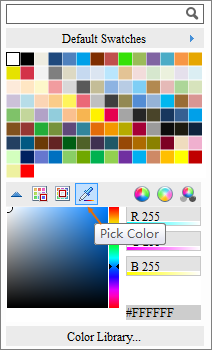
Image: Color Selection Panel dialog box - After setting the above parameters, click OK to execute the Tilt Texture Replacement operation. A Model Dataest named after the Dataset Name is generated under the specified Result Datasource.
- Click Undo to cancel the skew Texture Replacement operation.
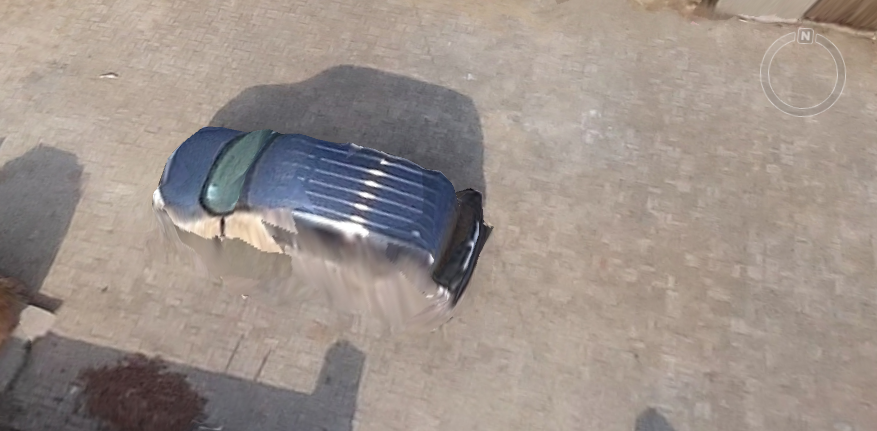
- The comparison effect before and after the sample Texture Replacement is as follows:
Figure: Oblique Texture Replacement rendering
Precautions
- Oblique Photography Texture Replacement operations also apply to model caching.