Particle Object Management window
Activate the Particle Object Management "window by selecting any Particle Object in the current Scene. As shown in the figure below, the operation area is mainly divided into three parts: toolbar, Context Menu, and Parameter Settings.
 |
| Figure: Particle Object Management Window |
Particle Object Management Window Toolbar
The Particle Object Management window toolbar provides five Function Buttons for different levels of 3D Geometry.
- Add child object: Click
 the button to add a child object to an object of this level. The emitter level does not support adding child objects.
- Clear sub-objects: Click
 the button to remove all sub-objects of the object at this level. The emitter level does not support clearing sub-objects.
- Remove: Click
 the button to remove the object of this level and all its sub-objects. Particle Object level cannot be removed.
- Import Particle Object: Select the Particle Object level and click
 the button to pop up the Open dialog box to find and locate the 3D particle resource file to be imported. The resource file is in *.par format (i.e. XML file). Record the values of the parameters of the 3D Particle and the particle system object it holds. Click Open.
- Export Particle Object: Select the Particle Object level and click
 the button to pop up the Save As dialog box. Select the storage location of the 3D particle resource file to be exported. The resource file is in *.par format (i.e. XML file). Record the parameter values of 3D Particles and the particle system objects they hold. Enter the file name of the new particle resource file, and click Save.
Context Menu in the Particle Object Management window
In The Particle Object Management window, the Context Menu function is provided for the user to manage all 3D Particles in the scene, Particle Objects of SuperMap and their sub-objects.
- Locate: Quickly locate the selected Particle Object and display it in the Center Display of the current Scene.
- Add Particle: Adds a particle to the Particle Object.
- Empty Particles: Remove all particles in the Particle Object.
- Import Particle Object: The Open dialog box pops up to find and locate the 3D particle resource file to be imported. The resource file is in *.par format (i.e. XML file), which records the parameter values of 3D particles and their particle system objects. Click Open.
- Export Particle Object: The Save As dialog box pops up. Select the storage location of the 3D particle resource file to be exported. The resource file is in *.par format (i.e. XML file), which records the parameter values of 3D particles and their particle system objects. Enter a file name for the new particle resource file, and click Save.
- Add Emitter: Adds a particle emitter to the particle system.
- Empty Emitter: Removes all particle emitters from the particle system.
- Delete particle: Remove the particle.
- Delete Emitter: Removes the particle emitter.
Particle Object Management window
Parameter Description
In the Particle Object Management window, the Particle Object of SuperMap is mainly divided into three layers: the parameters of Particle Object, the parameters of particles (particle system), and the parameters of emitters.
Click the right mouse button on the - created Particle Object, select the "Attribute" item in the pop-up Context Menu, and activate the "Particle Object Management" window. After selecting the Particle Object root node hierarchy in the tree structure, you can edit the Particle Object layer parameters.
 |
| Figure: Particle Geometry Diagram |
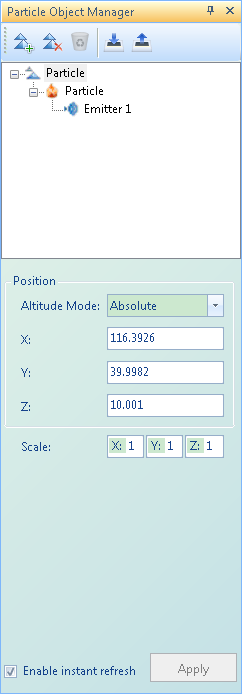
- Location:
- Height Mode: Sets the height mode used by the Particle Object. For height mode, see: About the height mode for details.
- Data from: the source of Select Data, which is aboveground data or underground data. Wherein the underground data is used for displaying the underground Scene effects.
- X, Y, Z coordinates: 3D coordinate values of the Particle Object's position. X and Y latitude and longitude coordinates cannot exceed ± 180.
- Zoom: Set the zoom-in or zoom-out ratio along the (X, Y, Z) axis respectively.
To edit the layer structure parameters of - particles (particle system), select the Particle root node level in the tree structure to edit the Particle Object layer parameters.
 |  |  |  |
| Figure: Particle Geometry Particle System Parameter | Figure: Particle Geometry influencer parameter | Figure: Particle Geometry influencer parameter | Figure: Particle Geometry influencer parameter |
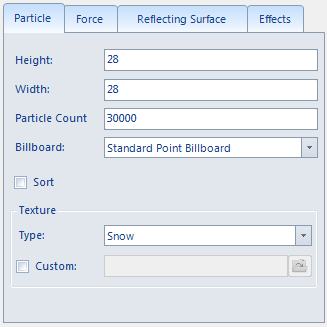
- Individual particle height and width: You can adjust the size of each particle by setting the size of the particle map's Height and Width.
- Maximum number of particles: The maximum number of particles in the current particle system. When the number of particles present in the scene by the particle system exceeds the set upper limit, the emitter stops emitting particles until a portion of the particle lifetime ends and the number falls below the upper limit.
- Billboard: Similar to a Texture Map used by a face object to hold a single particle, you can choose how the face object faces the camera. There are three ways:
- Standard Point Board: At this point, the particles will always face the camera completely.
Rotate the billboard in a - common direction: The particles now rotate around a common direction axis to face the camera as far as possible.
- Y-axis rotation billboard: At this time, the particles are always rotated around their own Y-axis to face the camera as far as possible.
- Sort: Check the sort function to make the display of particle effects preferentially render particles close to the camera position, so that the effect is better and more reasonable (it will take up a small part of resources).
- Map: There are two ways to obtain maps: Type Selection and Custom Map. In the drop-down list on the right side of "Type", the user can select the Texture Map commonly used for several special effects provided by the system, or check the "Custom Map" item to draw the map by himself for special effect editing. The particle maps provided
are currently available in the following formats: *.png, *.tga, *.dds, *.tif, *.jpg (black appears transparent when the transparency map is used).
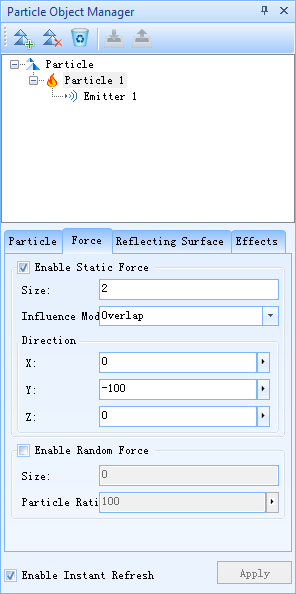
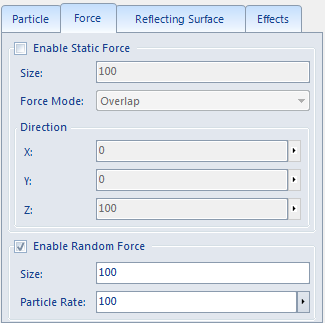
- Enable Static Force: Starts the Static Force function.
- Size: Sets the size of the static force.
- Action Mode: superposition mode and average mode.
- Direction: the direction of the force according to the X, Y, Z Coordinate Settings.
- Enable random force: Enable the random force function.
- Size: Sets the size of the static force.
- Particle Scale: The scale of the affected particles.
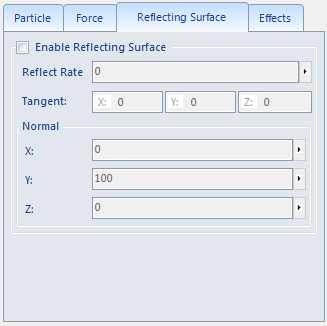
- Enable Reflective Faces: Enables particles to reflect at a certain location.
- Reflect Rate Ratio: Sets the rate at which particles affected by the reflection effect are reflected. Reflect Rate Ratio = Rate at which particles are reflected/Rate at which particles are reflected.
- Tangent point: through a point and the normal direction of the reflecting surface, a unique reflecting surface can be determined; the position of this point is called tangent point, and the coordinate position of the tangent point is set (the coordinate system is the local coordinate system relative to the Particle Object).
- Normal: the direction of the normal of the reflecting surface (the normal of the reflecting surface: always perpendicular to the dotted line of the reflecting surface). The normal direction is determined by the X, Y and Z directions.
- Enable Color Gradient: Turn on Color Gradient Effect to change the color of particles after emission.
- Transparency: After the particles are emitted, the transparency can have a certain amount of change over time (per second). The user can control the amount of change in the transparency of the particles per second through this parameter. The range of transparency is -100, 100.
- Color Red, Green, Blue: The user can individually control the amount of change in the color gradient of the particles per second. The value of each color component is in the range -100, 100. The higher the value, the closer it is to the color component when representing the gradient.
- Enable size scaling: Turn on the particle size scaling effect.
- Scale Rate: Parameter Settings The scaling rate of the particles per second.
- Enable rotation: Turn on the rotation effect.
- Angle: Particle Rotation Angle will be between the minimum and maximum values Random Distribution, unit: angle, values range from 0 to 360. You can either directly drag the minimum/maximum slider of the double slider to set the Rotation angle, or click the number behind the slider and enter the value in the pop-up text box.
- Speed: The particle rotation speed will be between the minimum and maximum values Random Distribution, in degrees/second, from -360 to 360. You can either directly drag the min/Max slider of the double slider to set the rotation speed, or click the number behind the slider and enter the value in the pop-up text box.
Parameter editing of the - particle emitter layer structure.
 |  |
| Figure: Particle Emitter | Figure: Particle motion parameter |
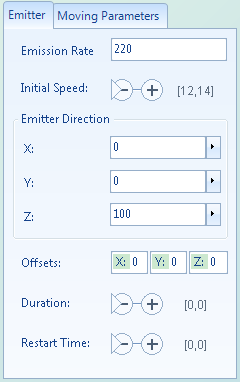
- Emission frequency: The number of particles emitted per unit time. For point particles (flame, explosion, etc.), the emission frequency is controlled at 0,2000; for rain and snow surface particles, the emission frequency is controlled at 0,5000.
- Initial Velocity: Sets the minimum and maximum initial velocity ranges for particle emission. You can either directly drag the minimum/maximum slider of the double slider to set the initial speed, or click the number behind the slider and enter the value in the pop-up text box.
- Emission direction: The final emission direction of the particle is determined by the X, Y and Z coordinate axes respectively.
- Emitter Offset: Adjust the final offset of the emitter from the origin in the Particle Object by setting the X, Y, and Z coordinate offsets.
- Duration: Set the minimum and maximum life time of the transmitter in seconds from 0 to 20. You can either directly drag the minimum/maximum slider Set time of the double slider, or click the number behind the slider to enter the value in the pop-up text box.
- Restart time: Set the minimum and maximum repeated start time of the transmitter. You can either directly drag the minimum/maximum slider Set time of the double slider, or click the number behind the slider to enter the value in the pop-up text box.
- Max Offset Angle: The angle at which particles are offset from the emission direction after emission.
- Start color: Set the initial color of particle emission.
- End Color: Sets the color at the end of particles.
- Time to Live: Sets the minimum and maximum random time to live for a particle. You can either directly drag the minimum/maximum slider Set time of the double slider, or click the number behind the slider to enter the value in the pop-up text box.
- Enable Instant Refresh and Apply: Click Apply to assign the changed particle attribute parameters to the Particle Object and Display Effects. Selecting Enable Instant Refresh for a Particle Object in the scene updates the changed parameters in real time.


