Instructions for use
The Rotate Model "function can rotate the selected or all models in the scene, and support plane and spherical data. At present, two rotation methods are provided, one is to take the Dataset Center point as the rotation center, and the other is to Custom Rotation Center by longitude and latitude.
Operation steps
- Right-click Datasource in Workspace Manager and select Open File Datasource "to open the Datasource containing the Model Dataest.
- Select Model Dataest, right-click the Add to New Spherical Scene ", select the Model Dataset Layer in Layer Manager, and right-click the Jump to Layer".
- Click the Model Edit Drop-down Button in the Model Operation group of the 3D Geographic Design tab and select Rotate Model "from the drop-down menu. The Rotate Model "dialog box pops up, as shown in the following figure:.
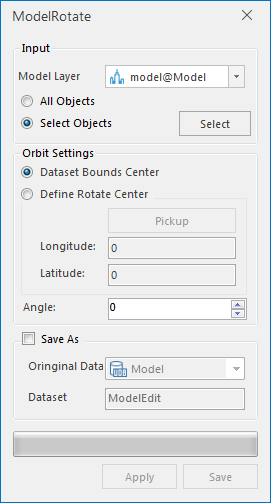 |
| Figure: Rotate Model "Dialog Box |
- Set the source data: click the drop-down arrow on the right side of the model layer, and select the layer of the model to be rotated in the drop-down box. To rotate All Objects on the model layer, click "All Objects"; otherwise, click "Select Objects".
- The Select Objects "indicates that only the selected model will be rotated. After clicking the Select Objects ", click the Polygon Query" button, attach a red dot to the tip of the mouse, select the range of the rotating model in the model layer with the mouse box, and Right click to end to pop up the Polygon Query "dialog box, as shown in the following figure.
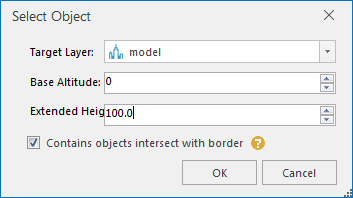 |
| Figure: Polygon Query "Dialog Box |
In the Polygon Query "dialog box, you can set a range in the vertical direction based on the query range drawn, so that the objects contained in the set range participate in the Rotate Model. Select a Dataset to participate in the Rotate Model at the Target Layer ", and enter a value at the Bottom Altitude" and Extended Height ". Objects within this range will participate in the Rotate Model. Customize whether to check "Includes the object that intersects the boundary". When "Includes the object that intersects the boundary" is checked, Indicates that the intersection object participates in the Rotate Model; otherwise, the intersection object does not participate in the Rotate Model. Click OK to perform the Select operation and return to the Rotate Model "dialog box.
- Set the Rotate Model parameters: Center and Rotation angle. The "Center" is the Dataset Center point by default. When the "Custom Rotation Center" is selected, click the "Pick" button, and the mouse turns into a "+" character. Click the mouse in the model layer to obtain the longitude and latitude values in real time and display them in the corresponding text box. Or enter the longitude and latitude values directly to determine the Center. Enter the Rotation angle directly in the input box after the Rotation angle or adjust the Rotation angle with the up and down arrows to complete the Parameter Settings of the Rotate Model.
- Click the Apply button to execute the Rotate Model operation with the Rotate ModelResult Storage in the MultipleModelEdit Temporary Data. Multiple modifications of Rotate Model parameters are supported. Click Apply to preview the Rotate Model effect. Rotate 30 degrees counterclockwise, as shown in the following figure.
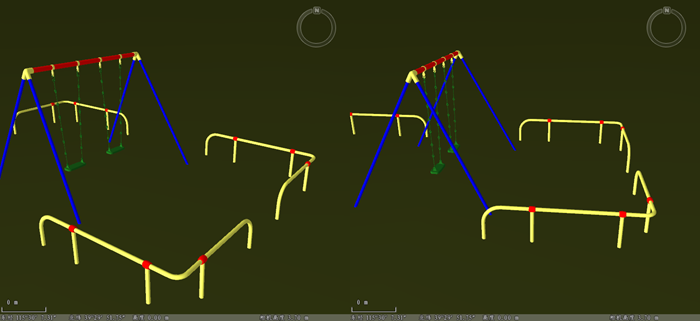 |
| Figure: Model rotated 30 degrees counterclockwise |
- Save the Rotate Model result. When the source Model Dataest needs to be overwritten, select "Save to source dataset" to execute the operation; To save the Rotate Model result, select the Save As Dataset "radio button, select Datasource and name the Dataset, and click the Save button to save the Rotate Model result.
 Precautions
- Ctrl + Z undoes the save operation.


