


Modify Grid Graudated Colors Map
Instructions for use
The user can modify various Parameter Settings of the Grid Graudated Colors Map in the " Grid Graudated Colors Map" setting window to achieve a thematic map effect more in line with the requirements. All Parameter Settings in the " Grid Graudated Colors Map" window will be reflected to the corresponding thematic map layer in the current Map in real time, that is, WYSIWYG.
Operation steps
- Select a Grid Graudated Colors Map layer in Layer Manager, and right-click the Modify Thematic Map.. ". The Grid Graudated Colors Map window displays the setting information of the selected Grid Graudated Colors Map.
- Thematic Map Layer: Displays the name of the currently rendered thematic map.
When making a Grid Graudated Colors Map based on Raster Layer, the Parameters displayed in the Grid Graudated Colors Map "window are described as follows:
- Segmentation method: The Drop-down Button to the right of the "Method:" item is used to set the segmentation method for each pixel value in the current Grid Graudated Colors Map. The user can select the appropriate segmentation method in the drop-down list of the item. Segmentation methods for Standard Deviation Interval and Quantile Interval are not supported for Grid Graudated Colors Map.
- Equal Interval: Based on the maximum and minimum values of all pixel values, perform equal interval segmentation according to the "number of segments" set by the user. In an Equidistant Interval, each segment has an equal length.
- Square Root Interval: Equidistant interval with the square root of all pixel values as the segment data. Firstly, take the square root of all pixel values, carry out Equidistant Interval to obtain the segmentation points of the processed data, and finally square the values of these segmentation points to obtain the segmentation points of the corresponding pixel values, so as to obtain the segmentation scheme of all pixel values.
- Logarithmic Interval: is basically the same as the Square Root Interval method, except that the Square Root method takes the square root of all pixel values, while the Logarithmic Interval method takes the logarithm of the pixel values. That is, an Equidistant Interval is performed on the base-10 logarithm of the pixel value. Firstly, perform Equidistant Interval on the logarithm of all pixel values to obtain the processed segmentation points, and then take 10 as the base, and take the values of these segmentation points as the power of the exponent to obtain the values of the segmentation points corresponding to the pixel values, so as to obtain the segmentation scheme.
- Custom Interval: The user specifies the length of each segment, that is, the "single segment length" for segmentation. The "number of segments" is calculated by the application system according to the specified interval distance and the maximum and minimum values of all pixels, and cannot be controlled by the user.
- Number of Segments: The "Number of Segments:" spin box is used to display and set the number of segments for the current Grid Graudated Colors Map to segment the pixel value, that is, the number of range segments.
- Length of single segment: The "Interval:" digital display box is used to display and set the interval distance of the current Grid Graudated Colors Map segment, that is, the length of each range segment. The setting of this item is only effective when the segment method is Custom Interval.
- Segment title format: The Drop-down Button on the right side of the "Label Format:" item is used to specify the format for expressing the segment field range of each range. Two formats are mainly provided, which can be selected and set through the combo box on the right side.
- Color Scheme: The "Color Scheme:" combo box is used to display and set the color style of each range segment in the current Grid Graudated Colors Map.
- Special Value Setting: The user needs to set the Display Effects of some grid pixels with specific values.
- Special value: You can click the "Pick" button to pick a pixel value in the Grid Graudated Colors Map layer of Map and set it as a special value, or you can directly enter a value in the value box as a special value.
- The Special Value Style: label is used to set the display color of the specified grid value. Click the Drop-down Button on the right side of the "Special Value Style:" tab, and select a color in the pop-up color panel, and the pixel of the grid value will be displayed as the specified color.
- The Special Value Transparent Display: check box is used to set whether the specified grid value is Transparent Display. Check this box to set the specified grid value pixel to Transparent Display; uncheck this box to still display the specified grid value color in the specified color.
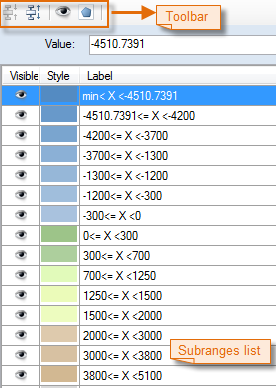
- Merge or split range segments: The list in the lower part of the tab lists all the range segments of the current Grid Graudated Colors Map, and the user can merge or split each range segment as required.
- The Merge button is used to merge the selected multiple continuous range segments into one range segment. The range range of the merged range segment is the union of the range ranges of all the merged range segments. If none or only one range segment is selected, or the selected range segments are not continuous, this button is unavailable.
- The Split button is used to split a selected range segment into two new range segments.
- Visibility setting: Whether the pixel corresponding to the range segment is visible or not can be controlled through the visible/hidden icon in the toolbar and in the range segment list.
- toolbar can control the visibility of the corresponding pixels of all selected range segments in the range segment list. The visible/hidden icon in
- each range segment item can control the visibility of the corresponding pixel of the range segment.
- Color Settings for each range segment: The user can click the style icon on the toolbar. Or click the grid pel style icon in each range segment entry in the range segment list Set the color of pixels corresponding to all the selected range segments in the current Grid Graudated Colors Map in the pop-up Color panel. In the "Color" panel, the user can directly select the color in the system predefined color table, or click the "Other Color.." button at the bottom of the "Color" panel to edit the required color in the pop-up "Color" dialog box. The "Segment Value" spin box under the
- Segment Value: toolbar displays the value of the segment point (the end point of the segment) of each range segment (as shown in the figure above). Each spin box corresponds to a segment point, and the value of the segment point can be changed through the spin box. The changed results are reflected on the current Graudated Colors Map layer in real time.
- Setting of range segment annotation content: The text in the green rectangular box shown in the above figure is the annotation content of the range segment. The annotation content can be modified. Just select the annotation content to be edited and click the mouse again. The text content can be changed to the editable state.
- The Parameter Settings in the Grid Graudated Colors Map "window will be reflected to the corresponding thematic map layer in the current Map in real time, that is, WYSIWYG. You can also disable Enable Real-time Refresh by unchecking the Enable Instant Refresh "checkbox at the bottom of the dialog box. If the "Enable Instant Refresh" "check box is not checked, the user can click the" Apply "button at the bottom of the dialog box to apply the Parameter Settings in the dialog box to the current thematic map after completing the Parameter Settings.
- of the Grid Graudated Colors Map "window
 |
| Figure: Properties tab |
- The visible/hidden icon button in the
Remark
- The Grid Graudated Colors Map made and modified by the user can be saved as a template so as to be applied to the thematic map making of other layers. For the Save as thematic map template, please refer to the Save as thematic map template. For details, please refer to the Save to Thematic Map Template Library。
- When Create Thematic Map in the Use Template mode, the user can directly select the saved template in the drop-down menu of the Template Drop-down Button to apply it to the production of other thematic maps.