Draw Orthogonal Polygon
Function Description
Orthogonal Polygon is a kind of polygon which is widely used in house planning and design. Orthogonal Polygon is often used to represent regular houses or models with orthogonal structure.
Function entrance
- Object Operation tab-> Object Drawing group-> Orthogonal Polygon.
Operating instructions
Draw an Orthogonal Polygon
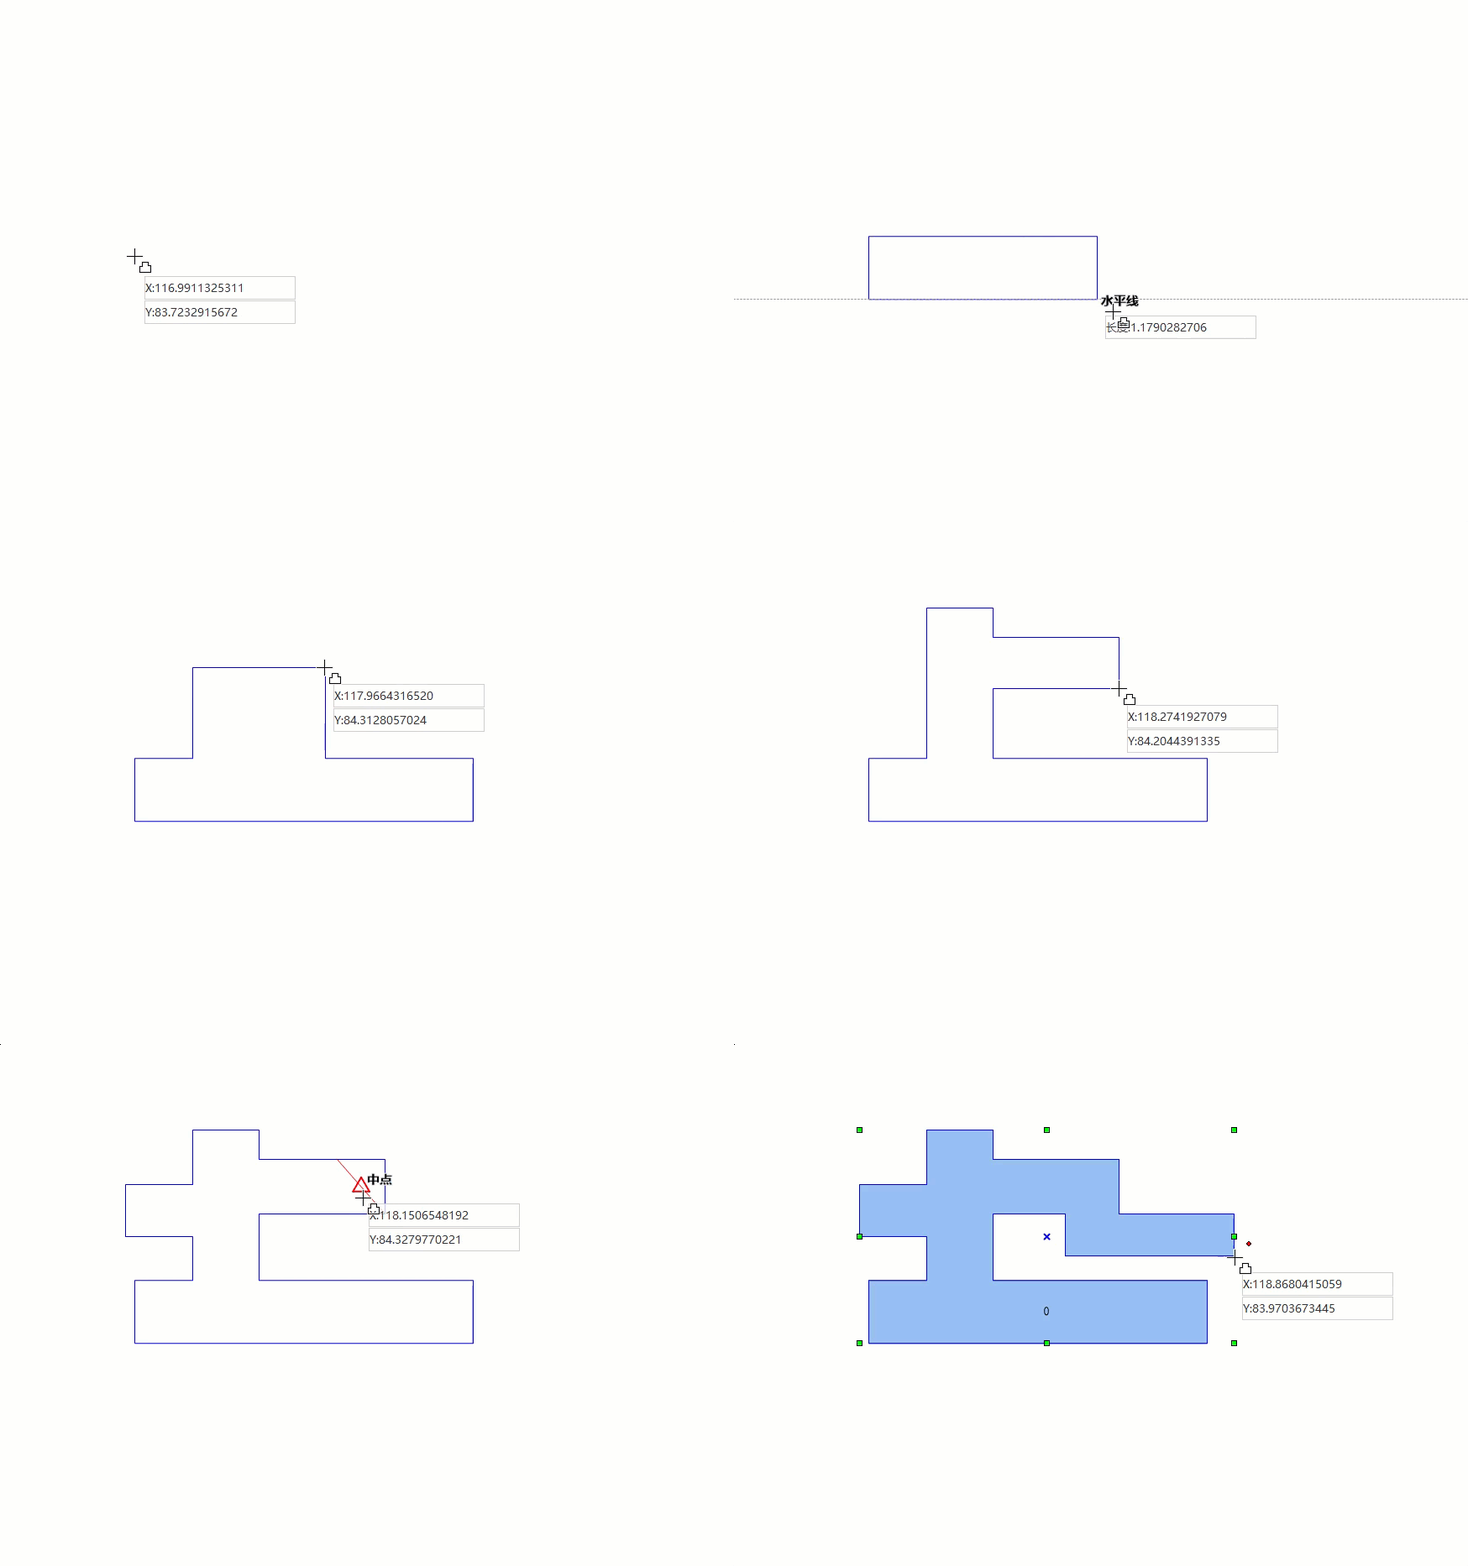
- On the Object Operation tab, in the Object Drawing group, click the Orthogonal Polygon Drop-down Button and select the Orthogonal Polygon button from the drop-down menu. The Orthogonal Polygon cursor appears.
- Move Stop by Mouse to Map, and you can see that the coordinate value of the current mouse position will be displayed in the Parameter Input box in real time as the mouse moves. Enter the starting point coordinates of the first edge of the Orthogonal Polygon in the Parameter Input box (you can switch between the two Parameter Input boxes by pressing the Tab key) and then press the Enter key to determine the starting position of the Orthogonal Polygon.
- Move the mouse, and you can see that with the movement of the mouse, the length of the line connecting the mouse position and the starting point and the included angle between the line and the positive direction of the X axis will be marked in the Map in real time (you can switch between the two Parameter Input boxes by pressing the Tab key), and enter the length and angle values in the Parameter Input box. Press Enter to finish drawing the first edge of the Orthogonal Polygon.
- Moving the mouse now causes a blue line to appear orthogonal to the first edge. You can move in the direction orthogonal to the first side (90 or 270), enter the length of the second side in the Parameter Input box, and press Enter to complete the second side of the Orthogonal Polygon. Enter a positive value to draw to the left perpendicular to the previous edge, and a negative value to draw to the right perpendicular to the previous edge.
 Caution:
 At this point, click the right mouse button, and when you finish drawing, you will get a rectangle.
- Continue drawing the next edge of the Orthogonal Polygon in the same manner.
- Right-click to end the current drawing operation.
Draw a New Orthogonal Polygon.
- On the Object Operation tab, in the Object Drawing group, click the Orthogonal Polygon Drop-down Button and select New Orthogonal Polygon from the drop-down menu. The Orthogonal Polygon cursor appears.
- Move Stop by Mouse to Map, and you can see that the coordinate value of the current mouse position will be displayed in the Parameter Input box in real time as the mouse moves. Enter the starting point coordinates of the first edge of the Orthogonal Polygon in the Parameter Input box (you can switch between the two Parameter Input boxes by pressing the Tab key) and then press the Enter key to determine the starting position of the Orthogonal Polygon.
- Move the mouse, and you can see that with the movement of the mouse, Map will display the length from the current mouse to the starting point and the included angle with the X coordinate in real time. You can click the left mouse button or press the Tab key to input the length and angle in the two Parameter Input boxes to complete the drawing of the end point of the first edge.
- Move the mouse, and you can see that a temporary orthogonal rectangle will be drawn in Map with the movement of the mouse, and the length from the mouse position to the first side will be marked in real time. Enter the length value in the Parameter Input box, and press Enter to complete the drawing of the temporary orthogonal rectangle.
- Move the mouse to a new position and click the left button or input the coordinate value to determine the position of the first side of the next temporary rectangle, move the mouse and then press the left button or input the coordinate value to determine another angular point on the diagonal of the temporary rectangle, At this time, the Application automatically connects the original temporary rectangle with the new mouse position value to form a temporary Orthogonal Polygon.
- If you click the right button at this time, an Orthogonal Polygon will be generated. If you want to draw a more complex Orthogonal Polygon, you can repeat the previous step.

 Caution:
 Both
the Orthogonal Polygon and New Orthogonal Polygon commands complete the drawing of Orthogonal Polygon. The two differ only in the way they are drawn. The Orthogonal Polygon command needs to input the side length of the rectangle several times during the drawing process, while the New Orthogonal Polygon command needs to input the coordinate value of one corner of the diagonal of the rectangle.


