This section introduces the installation of DB2 program. Please refer to the help for the supported platform. This help mainly introduce the installation on Window. It is suggested that install DB2 9.7 version based on the optimal performance of DB2 database
- Double click setup.exe program and pop up the DB2 Setup Launchpad, as shown below.

Figure: The DB2 Setup Launchpad - Click the Install a Product link on the window left to enter the page of Install a Product. This page lists all the DB2 products that are available. Select DB2 Advanced Enterprise Server Edition Version 9.7 Fix Pack 4 and click the Install New button.

Figure: Select the DB2 products - Pop up the following Welcome dialog box and click Next button.

Figure: The Welcome dialog box - Pop up the Software License Agreement dialog box. Please read the following license agreement carefully. If you accept this license, please select I accept the terms in the license agreement and click the Next button; If you don't accept this license, please select the I do not accept the terms in the license agreement and click the Cancel button to exit the installation.

Figure: The Software License Agreement dialog box - Continue installing and pop up the Select the installation type dialog box.
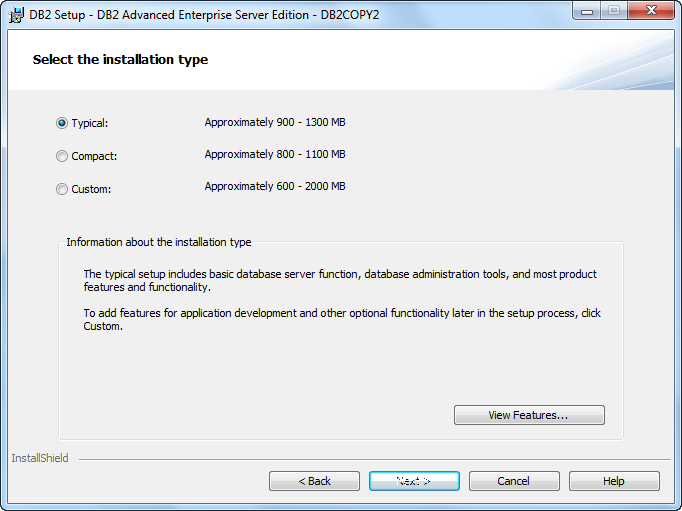
Figure: The Select Installation Type dialog box. Select the installation as the Typical Installation. You can view all the functional units by clicking the View Features... button.
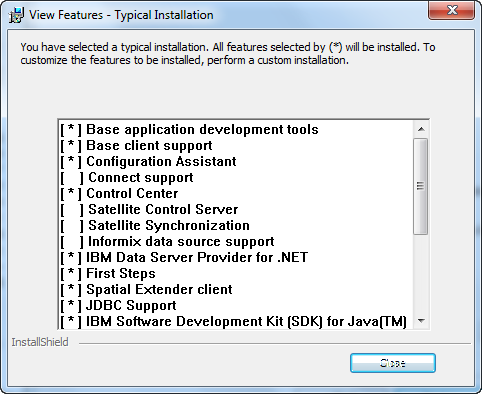
Figure: The View Features dialog box - Continue installing and pop up the Select the installation, response file creation, or both dialog box. Click the Next button.
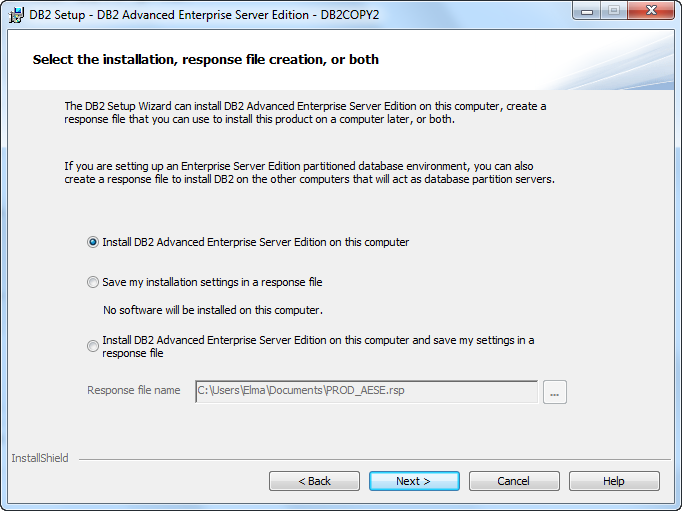
Figure: The Select the installation, response file creation, or both dialog box The response file is a text file containing the settings and configuration. The DB2 installation can read this file and execute the installation according to the specified value. The installation with response file is also called Silent Installation. It provides the access for the parameters of DB2 Installation Wizard Settings.
- Continue installing and pop up the Select the installation folder dialog box. If the system install it by default, click the Next button directly; If click the Changes... button to specify the installation path, click the Next button.

Figure: The Select the installation folder dialog box If users select the Custom mode, pop up the Select the features to install dialog box. Users can select the features according to their needs. You also need to specify the installation folder, as shown below.

Figure: The Select the features to install dialog box - Continue installing, and pop up the Set user information for the DB2 Administration Server dialog box. Here you need to set the password for the DB2 administration server and click the Next button.

Figure: The DB2 Administration Server dialog box "DB2 Administration Server" (DAS) is a kind of special DB2 administration service, which is used to support GUI tools and help manage the tasks on the local and remote DB2 server. DAS has a specified user account. When start the DAS server, it uses this user account to make the DAS service log in the computer.
DAS user has the SYSTEM permissions for every DB2 system in your environment, so that it can start ans stop other instances when you need to.
- Continue installing, and pop up the Configure DB2 instances dialog box. If you user the default configuration, click the Next button directly; If you change the configuration of DB2 instance, click the Configure... button.
Instance is also called database administration program. It is the DB2 code to admin the data.It can control the implementations for the data and manage them to their child systems. Each instance has the following features:
- Every instance is a complete environment, including all the database partitions defined by the given parallel database system.
- Every instance has its own database (Other instances can't assess), and all its database partitions share the same mother system.
- It has the independent safety and other instances in the same system don't influence it.

Figure: The Configure DB2 instances dialog box In the Configure DB2 instances dialog box, you can configure the service name and port number of DB2 instance. You also can' configure it after finish installing, as shown below.

Figure: The "DB2 Instance Configuration" dialog box - Continue installing, and pop up the DB2 instance configuration dialog box. Set the related user information of the default DB2 instances.

Figure: The DB2 instance configuration dialog box - Continue installing and pop up the Prepare the DB2 tools catalog dialog box. Click the Next button.
Only create the DB2 tools catalog, can you use the task center and dispatcher. The database created by DB2 tools catalog is stored in the DB2 database.

Figure: The Prepare the DB2 tools catalog dialog box - Continue installing, and pop up the Set up notifications dialog box, which is used to configure SMTP server for the DB2 server. You can send the running status alarm to the SMTP server. If you cancel the check box before Set up your DB2 server to send notifications, the running status of DB2 will be recored in the administration log, as shown below. Click the Next button.

Figure: The Set up notifications dialog box - Continue installing and pop up the Enable operating system security for DB2 objects dialog box. Click the Next button.

Figure: The Enable operating system security for DB2 objects dialog box - Continue installing and pop up the Start copying files dialog box. Click the Finish button.

Figure: The Start copying files dialog box. - After finish installing, pop up the Setup is complete dialog box and click the Next button to install other products.

Figure: The Setup is complete dialog box - Pop up the Install additional products dialog box. If you don't want to install the additional products, click the Finish button. If you want to install the additional products, click the Install button to install the additional products.

Figure: The Install additional products dialog box
 Related Topics