 Introduction
Create Scene Cache it used to create different types of cache files for the dataset in the current scene.
Scene cache is to create cache for the whole scene, create the corresponding cache for different types of data layers loaded to the scene. When creating scene cache, create image cache layer for image layer, create terrain cache layer for terrain layer, create vector cache layer for vector layer, create map cache layer of map layer, the cache layer (such as model cache layer) or KML layer will remain the same.
A new workspace and a number of cache folders are created a the result path after the scene cache is generated. The new workspace saves not only a variety of new generated cache layers, but also the style information of all cache layers. By default, the name of the newly generated workspace is the same as the name of the scene. Users can specifies the name of the generated workspace and scene by setting the corresponding interface.
Basic Steps
- When no object is selected in the scene window, right click in the scene window and select Create Scene Cache in the context menu.
- The Create Scene Cache dialog box appear, all the layers in the scene is displayed in the data list, as shown below:
- Data list:
- Data: The name of the data to create cache.
- Data source: The name of the datasource which contains the data to create cache. Maps are not contained by datasource, so the values are null.
- Cache Type: Displays the type of the 3D cache to create. The dropdown list displays all the cache type supported by the selected data. The application will automatically match cache type according to the layer type in the scene. For example, Vector cache format for vector layers, terrain cache format for terrain layers, vector model cache format for CAD model dataset, etc.The drop down list provides all supported cache types and you can directly choose from the list.
- Set the default parameters to create scene cache:
- Cache Extent: There are three methods to set cache extent: use the default extent of the system (refer to Creating 3D Scene Caches), or draw a extent with The Draw Extent button, or select object as the extent for the cache. You can't customize the cache extent in the select all status, but you can set the cache extent for single data.
- Scene Name: The name of current scene. It's untitled Scene if the scene is not saved.
- Cache Usage: It is used to set the usage of the scene cache. It supports the DDS and PVRTC. Textures compression means to save the textures in the format of compression, which can reduce the video memory used by textures.
Normal PC Device: Applicable to common compression texture format on PC computer.
iOS Devices: Applicable to common compression texture format on iOS. While compressing using this method this method, an offline package will be generated for usage on iOS devices.
Android Devices: Applicable to common compression texture on Android devices. While compressing using this method this method, an offline package will be generated for usage on Android devices.
- Scene Name: The name of the current scene.
- Cache Path: Input the output path in the textbox on the right of the Cache Path, it can be local path or network path; you can select the path with the browse button.
- Precache: If you select vector layers in the data list, you can check this box to create cache for the specified layers and realize data update.
Differences of precache and cache are:
Precache: The workspace for precaching keeps information in datasources and datasets, which helps realize vector data adding, deleting, modification and attribute data modification through iServer data services.
Non-precache: The workspace for non-precache keeps information as scence cache, without keeping datasets for original data.
- Tile Size (Pixels): Get size of each tile after preprocessing, with the unit being pixels. tha is, pixes*pixes. The application provides 2048*2048, 1024*1024, 512*512, 256*256, 128*128, 64*64, 32*32, 16*16. You can select among those sizes. Tile size takes effect for image and terrain data, not vector data.
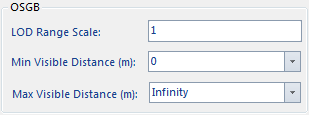
- LOD Level Setting: LOD is Levels of Detail, indicates the detail level of tiles cache display. Only if the cache type of the current layer is OSGB, this setting is available.
In the LOD Level value box, you can enter the value setting level directly. The LOD distance in the list box indicates the height of the camera height between the two layers.
Remarks: After setting the LOD level, when you add osgb cache to the scene, you can set scale times in the Layer Properties panel.
- Click OK to perform the create of the scene cache.
- The cache file created is placed in the folder named by the scene, for example, C:\Cache\WholeScene, the subfolder named by the scene name is created in the folder which saves different types of cache files. Untitled Scene folder saves non-map cache file and offline map package, Untitled Scene.smwu is the workspace, which saves the style information of the layers of the scene. Untitled Scene World Map cache folder saves the cache file created by the map, that is WorldMap.sci3d.
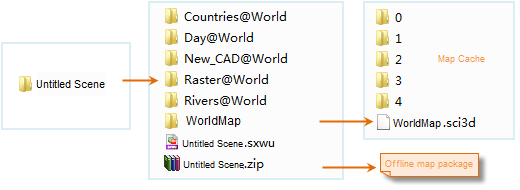
Figure: Results for entire global cache (non-tile cache) If the cache type is tile cache, the result for the entire scene is as shown below: OlympicGreen@OlympicGreen folder stores child folders of OSGB data and *.osgb data is saved in child folders.

Figure: Results for entire global cache (tile cache)
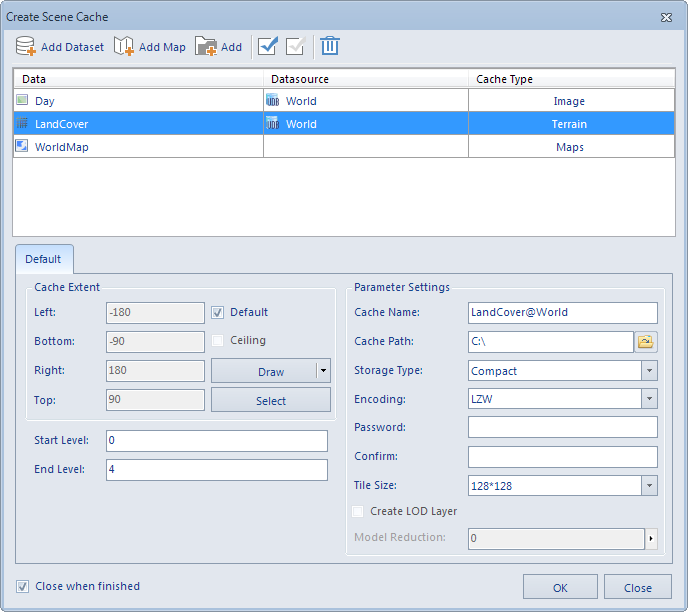 |
| Figure: Create Scene Cache dialog box |
 Note
Note
The application provides two methods to create scene cache, one is create scene cache with the Scene Cache button, the other is create cache for all the data in the scene with the Create Scene Cache.
The difference of them:
- The Scene Cache button is in the Performance group of the Scene tab because it is a way to improve the performance of the scene, so you need to open the scene to generate scene cache. The Create Scene Cache is in the context menu of the scene window, it is enabled when there are scene in the current workspace.
- You need to add the data and map used to create cache manually when using the Scene Cache command. But Create Scene Cache can only be used to create cache for the loaded dataset in the current scene.
- With Scene Cache, you can change the cache type to create with the dataset (mainly raster data), for example, for raster data, you can create terrain cache or image cache; But in Create Scene Cache, the cache type to create can not be changed.
- To view the result of scene cache, you need to open the corresponding cache file of each layer one by one; but Create Scene Cache will create a workspace which saves the styles of all the layers. To view the result, you just need to open the worksapce.
 Note
Note
- Note that, creating scene cache does not support route data currently. When creating scene cache, the application will filter the dataset not supported automatically.
- If there are vector data or model data in the current scene, the tile size for the cache generated for the data will be the tile size set in the Layer Propreties panel.
- The precaching function is only applicable to vector data in the scene.
- When you set the 2D point, line, region datasets height mode of the layer style to ClampToGround, you can not save its layer style, you need to set the Height Mode to Absolute or RelativeToGround.
- The network dataset sets the Gif texture of the pipeline style, does not support the generation of tile cache.
- The two-dimensional line datasets setting the pipeline style do not support generated tile cache.