


Manage and set layer-specific properties through the Layer Properties pane to optimize or adjust the loading and display of layers.
Left click the More button behind the specific layer, select Layer Properties from the pop-up menu, and the Layer Properties Panel pops up to set various properties. The specific operation steps are as follows:
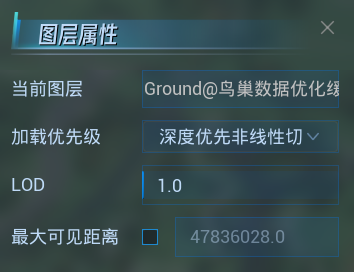
Load priority
Used to set the loading priority of S3M tile data, including four modes: depth-first, layer-first, depth-first linear and spatial index.
- Depth First: This mode preferentially loads all tiles of all pyramid levels within the current viewing angle range.
- Layer First: This mode preferentially loads all tiles of the current pyramid level
- Depth-first nonlinearity: This mode preferentially loads all tiles of all pyramids within the current viewing angle, but loads only coarser data farther away from the camera.
- Index priority: This mode can only support S3M data generated by tilt bin function of SuperMap iDesktopX11i (2023) for tilt photography 3D model, which can greatly improve loading efficiency of tilt photography 3D model.
LOD scaling
Used to set the scaling factor of switching distance between different layers of LOD of S3M tiles and terrain data. Default is 1.
You can adjust the LOD zoom by adjusting the slider below. The value range is [0.01, 100], and the larger the value, the coarser the data displayed. However, 3D pipeline data is contrary to other data. The larger the value, the finer the pipeline data.
Maximum visible distance
Used to set the maximum visible distance between the current observer of the scene and the S3M tile data in the layer, in meters. If the distance between the current observation point and the data in the scene is greater than the set value, the data will not be visible.
- Click the check box after the maximum visible distance to open the edit, and change the original value by directly typing the value or sliding left and right.
SHP data loading and layer property Settings
The new version has added the integration of *.shp vector data, enabling the attachment of blueprints/labels/vegetation based on point data, setting display styles and flow effects for line data, and setting display styles and stretching effects for surface data. The loading of shp vector data is carried out through local layers. It can be loaded before running or after running (loading after running is as a temporary layer and will not be saved when running again). Stylized Settings for shp vector data: Left-click the "More" button after a specific layer, and in the pop-up menu, select "Layer Properties". The "Layer Properties" panel will pop up. For different types of shp data, how to set them? The specific operation steps are as follows:
shp point data - Blueprint type
Basic Settings.
- The blueprint style references the blueprint materials in the material library (click here to download, extraction code: smsw). After the download is complete, extract it and copy the "SuperMap_Assets" folder to the "Content" directory of the project for use. By choosing the blueprint style function, you can directly select blueprint assets for display. At this time, all points will use one blueprint style. If different points need to use different blueprints, an attribute should be added to the shp data, and its attribute value should be filled with the "copy reference" content corresponding to the blueprint asset (the path of the blueprint asset is: UE project /Content/SuperMap_Assets/Marker/BP_Point, select blueprint assets, right-click "Copy Reference", and fill the obtained value into the properties of the shp data. Only blueprints that support filling in text will input text be effective. Scaling: Scaling of the entire blueprint asset. Bottom elevation: The bottom height of the blueprint asset (shp data does not have height information. If you want different points with different heights, you need to set it by specifying attributes).
Advanced Settings
- Visible distance: The visible distance of blueprint assets.
shp point data - Blueprint type
Basic Settings
- The blueprint style references the blueprint materials in the material library (click here to download, extraction code: smsw). After the download is complete, extract it and copy the "SuperMap_Assets" folder to the "Content" directory of the project for use. By choosing the blueprint style function, you can directly select blueprint assets for display. At this time, all points will use one blueprint style. If different points need to use different blueprints, an attribute should be added to the shp data, and its attribute value should be filled with the "copy reference" content corresponding to the blueprint asset (the path of the blueprint asset is: UE project /Content/SuperMap_Assets/Marker/BP_Point, select blueprint assets, right-click "Copy Reference", and fill the obtained value into the properties of the shp data. Only blueprints that support filling in text will input text be effective. Scaling: Scaling of the entire blueprint asset. Bottom elevation: The bottom height of the blueprint asset (shp data does not have height information. If you want different points with different heights, you need to set it by specifying attributes).
Advanced Settings
- Visible distance: The visible distance of blueprint assets.
shp point data - Label type
Basic Settings
- In the default mode, you can directly use the sample images provided by the plugin. At this time, all the points will use the same image style. If different points need to use different images, an attribute should be added to the shp data, and its attribute value should be filled with the "copy reference" content of the corresponding image asset (the path of the example image asset is: UE Project /Plugins/SuperMap HiFi 3D SDK for Unreal/Content/Resource, select the image asset, right-click "Copy Reference", and fill in the obtained value in the properties of the shp data. The text content supports two methods: either by uniformly filling in or by reading different contents of the attribute field. Zooming: Overall zooming of images and text.
Advanced Settings
- Only unified Settings are supported. You can set them as needed.
shp point data - Vegetation type
- The vegetation assets used also refer to the Plant materials in the material library (click here to download, extraction code: smsw). After the download is complete, extract it and copy the "SuperMap_Assets" folder to the "Content" directory of the project for use. Vegetation elevation: The bottom height of the vegetation (shp data does not have height information. If different points are to have different heights, it needs to be set by specifying attributes). For vegetation type, an attribute needs to be selected, and the vegetation is classified by reading the attribute value. Different attribute values correspond to one type of vegetation. Translation: In cases where points need to be moved, all points are uniformly translated. Scaling: Unified scaling of vegetation assets. Random size: Within the specified range, randomly generate vegetation of different sizes (randomness and scaling are independent and do not affect each other). Random Angle: Rotate the tree randomly along the Z-axis..
shp line data
Basic Settings
- Different values can be obtained by inputting a uniform value or through attributes in the data. Including: color, brightness, width, bottom height, flow rate, etc. Among them, the color is represented in hexadecimal, and thus is RGBA. For example, opaque red: #ff0000ff.
Advanced Settings
- Set different line types, and the flow line supports Settings such as reverse flow, circulation flow, etc..
shp plane data
Basic Settings
- Different values can be obtained by inputting a uniform value or through attributes in the data. Including: color, stretch height, bottom height, etc. Among them, the color is represented in hexadecimal, and thus is RGBA. For example, opaque red: #ff0000ff.
Advanced Settings
- Display mode: Supports two styles of entities: semi-transparent and opaque. Border line type: Solid line or none. Border color: Manually specify the border color.